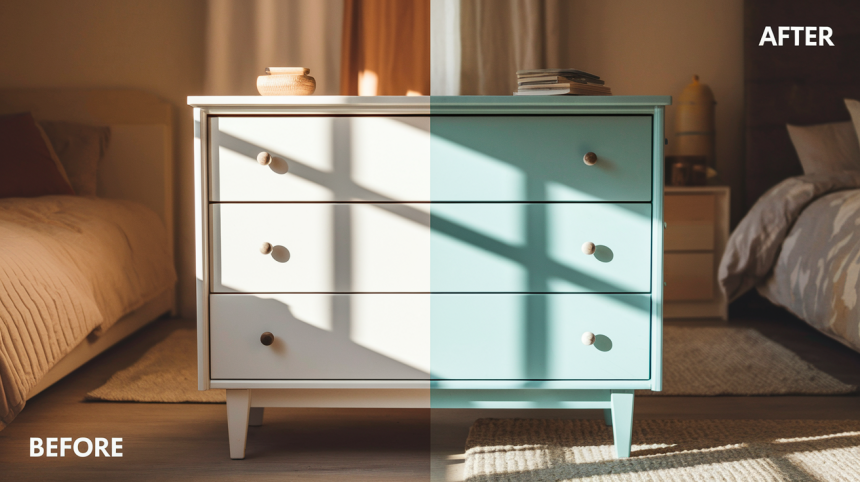
Turn your bland, mass-produced IKEA dresser into a personalized statement piece with the right paint techniques.
These practical Swedish staples offer the perfect blank canvas for creative customization at a fraction of the cost of high-end furniture.
While IKEA’s lightweight construction and laminate surfaces present unique painting challenges, the right preparation and materials make stunning results achievable for DIYers at any skill level.
No special artistic talent is required—just proper preparation, quality materials, and attention to detail.
This guide walks you through the process of converting your functional but forgettable IKEA dresser into a custom piece that looks deceptively expensive and perfectly complements your décor.
DIY Guide: Painting IKEA Dresser into a Stylish Matte Wood & Brass Piece
Upgrading IKEA furniture is a cost-effective way to achieve a high-end, personalized look.
This guide walks you through a step-by-step process to turn a basic pine dresser into a stunning West Elm-inspired piece with brass detailing.
Materials & Tools Required
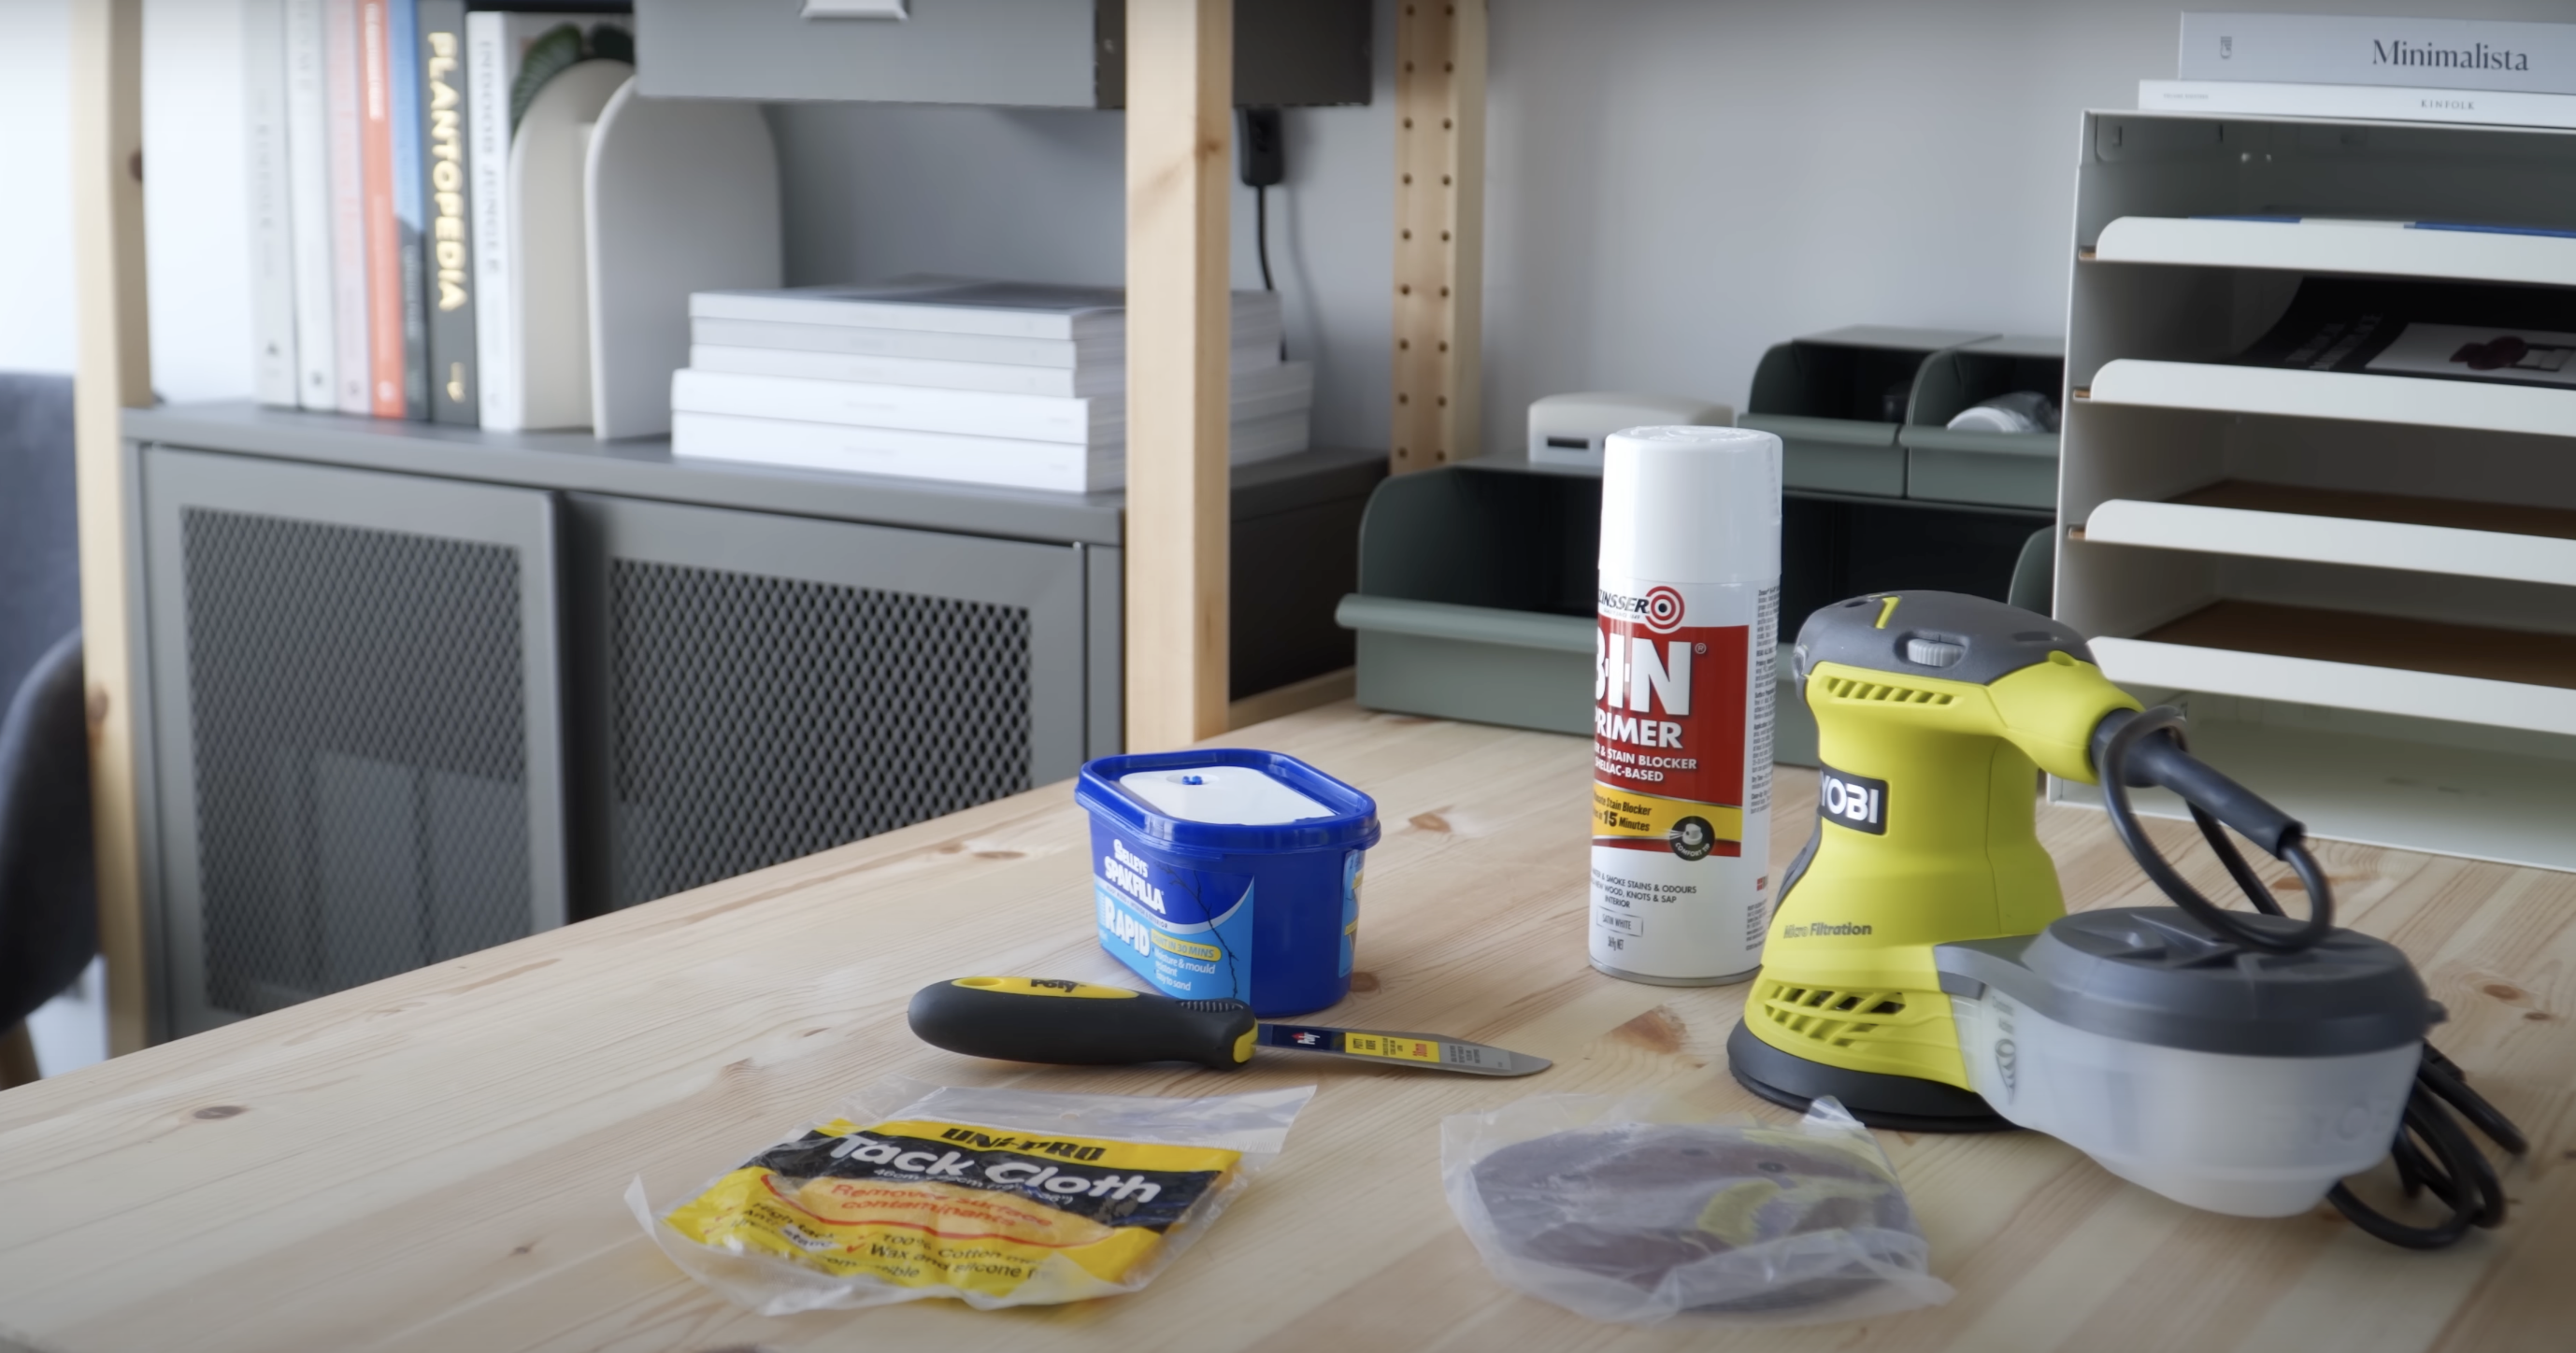
| Material / Tool | Purpose |
|---|---|
| IKEA Tarva Dresser | Base furniture piece for the project |
| Spackle & Putty Knife | Fills scratches and imperfections |
| Sander & 180-Grit Sandpaper | Smooths wood for better paint adhesion |
| Tack Cloth | Removes dust before priming |
| Shellac-Based Primer | Seals knots to prevent wood grain bleed-through |
| Water-Based Primer | Prepares remaining surfaces for painting |
| Paint Roller & Brush | Applies smooth coats of paint |
| Dulux Aqua Enamel Paint | Hard-wearing, chip-resistant finish |
| Painters Tape | Masks areas for gold accents |
| Spray Paint (Bright Gold) | Adds brass detailing to dresser legs |
| New Brass Knobs (10 pcs) | Upgrades original drawer hardware |
| Legs (4 pcs) | Adds an elegant furniture elevation |
| Leg Plates & Screws | Secures the new legs to the dresser base |
| Drill & Pilot Hole Bit | Prepares holes for leg plates and knobs |
| Measuring Tape | Ensures precise placement of hardware |
Step-by-Step Guide to Upgrading the IKEA Tarva Dresser
This process includes 6 major steps—from preparation to final assembly. Follow these steps carefully to achieve a durable, professional-looking finish.
Step 1: Preparing the Dresser for Painting
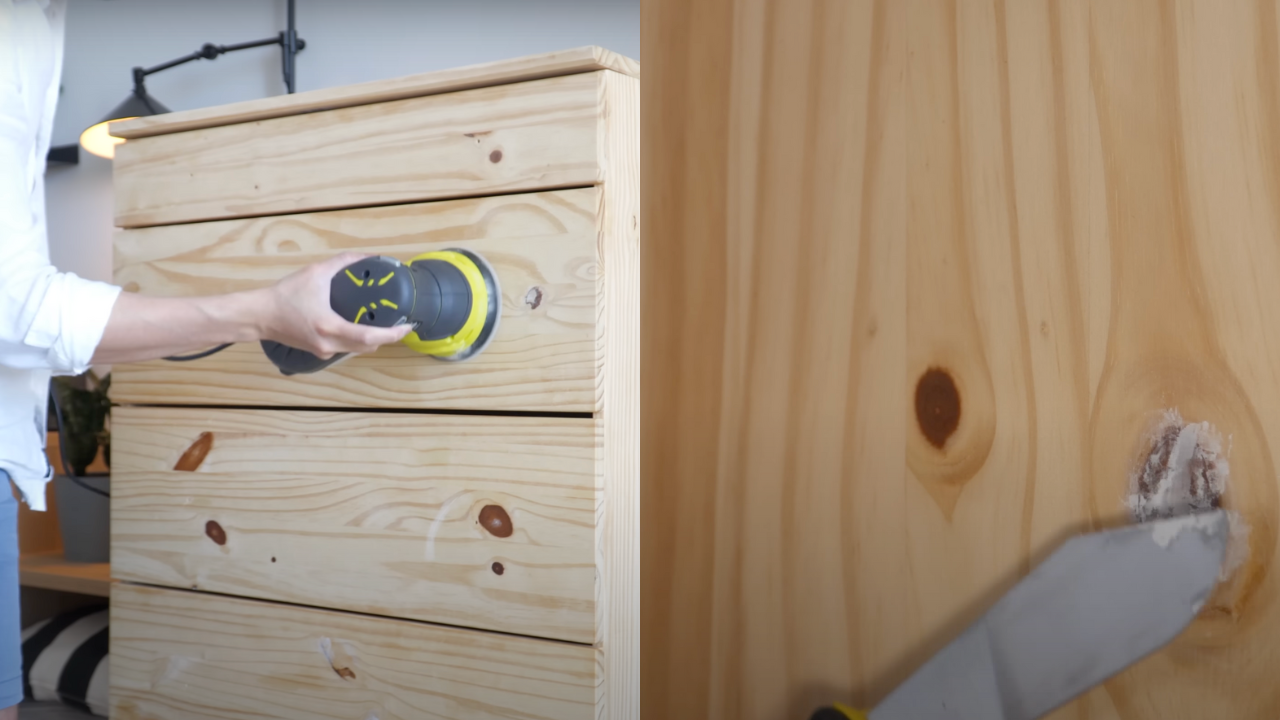
Before painting, the surface needs to be smooth and primed properly to ensure a long-lasting finish.
- Fill scratches and imperfections using a spackle and a putty knife.
- Let it dry, then sand the entire dresser lightly using 180-grit sandpaper with a random orbital sander (or a sanding sponge for a budget-friendly option).
- Wipe down the dresser using a tack cloth to remove all dust and debris.
Key Considerations:
Proper prep work prevents peeling and enhances paint durability.
A smooth surface ensures an even application of paint.
Step 2: Applying Primer to Seal the Wood
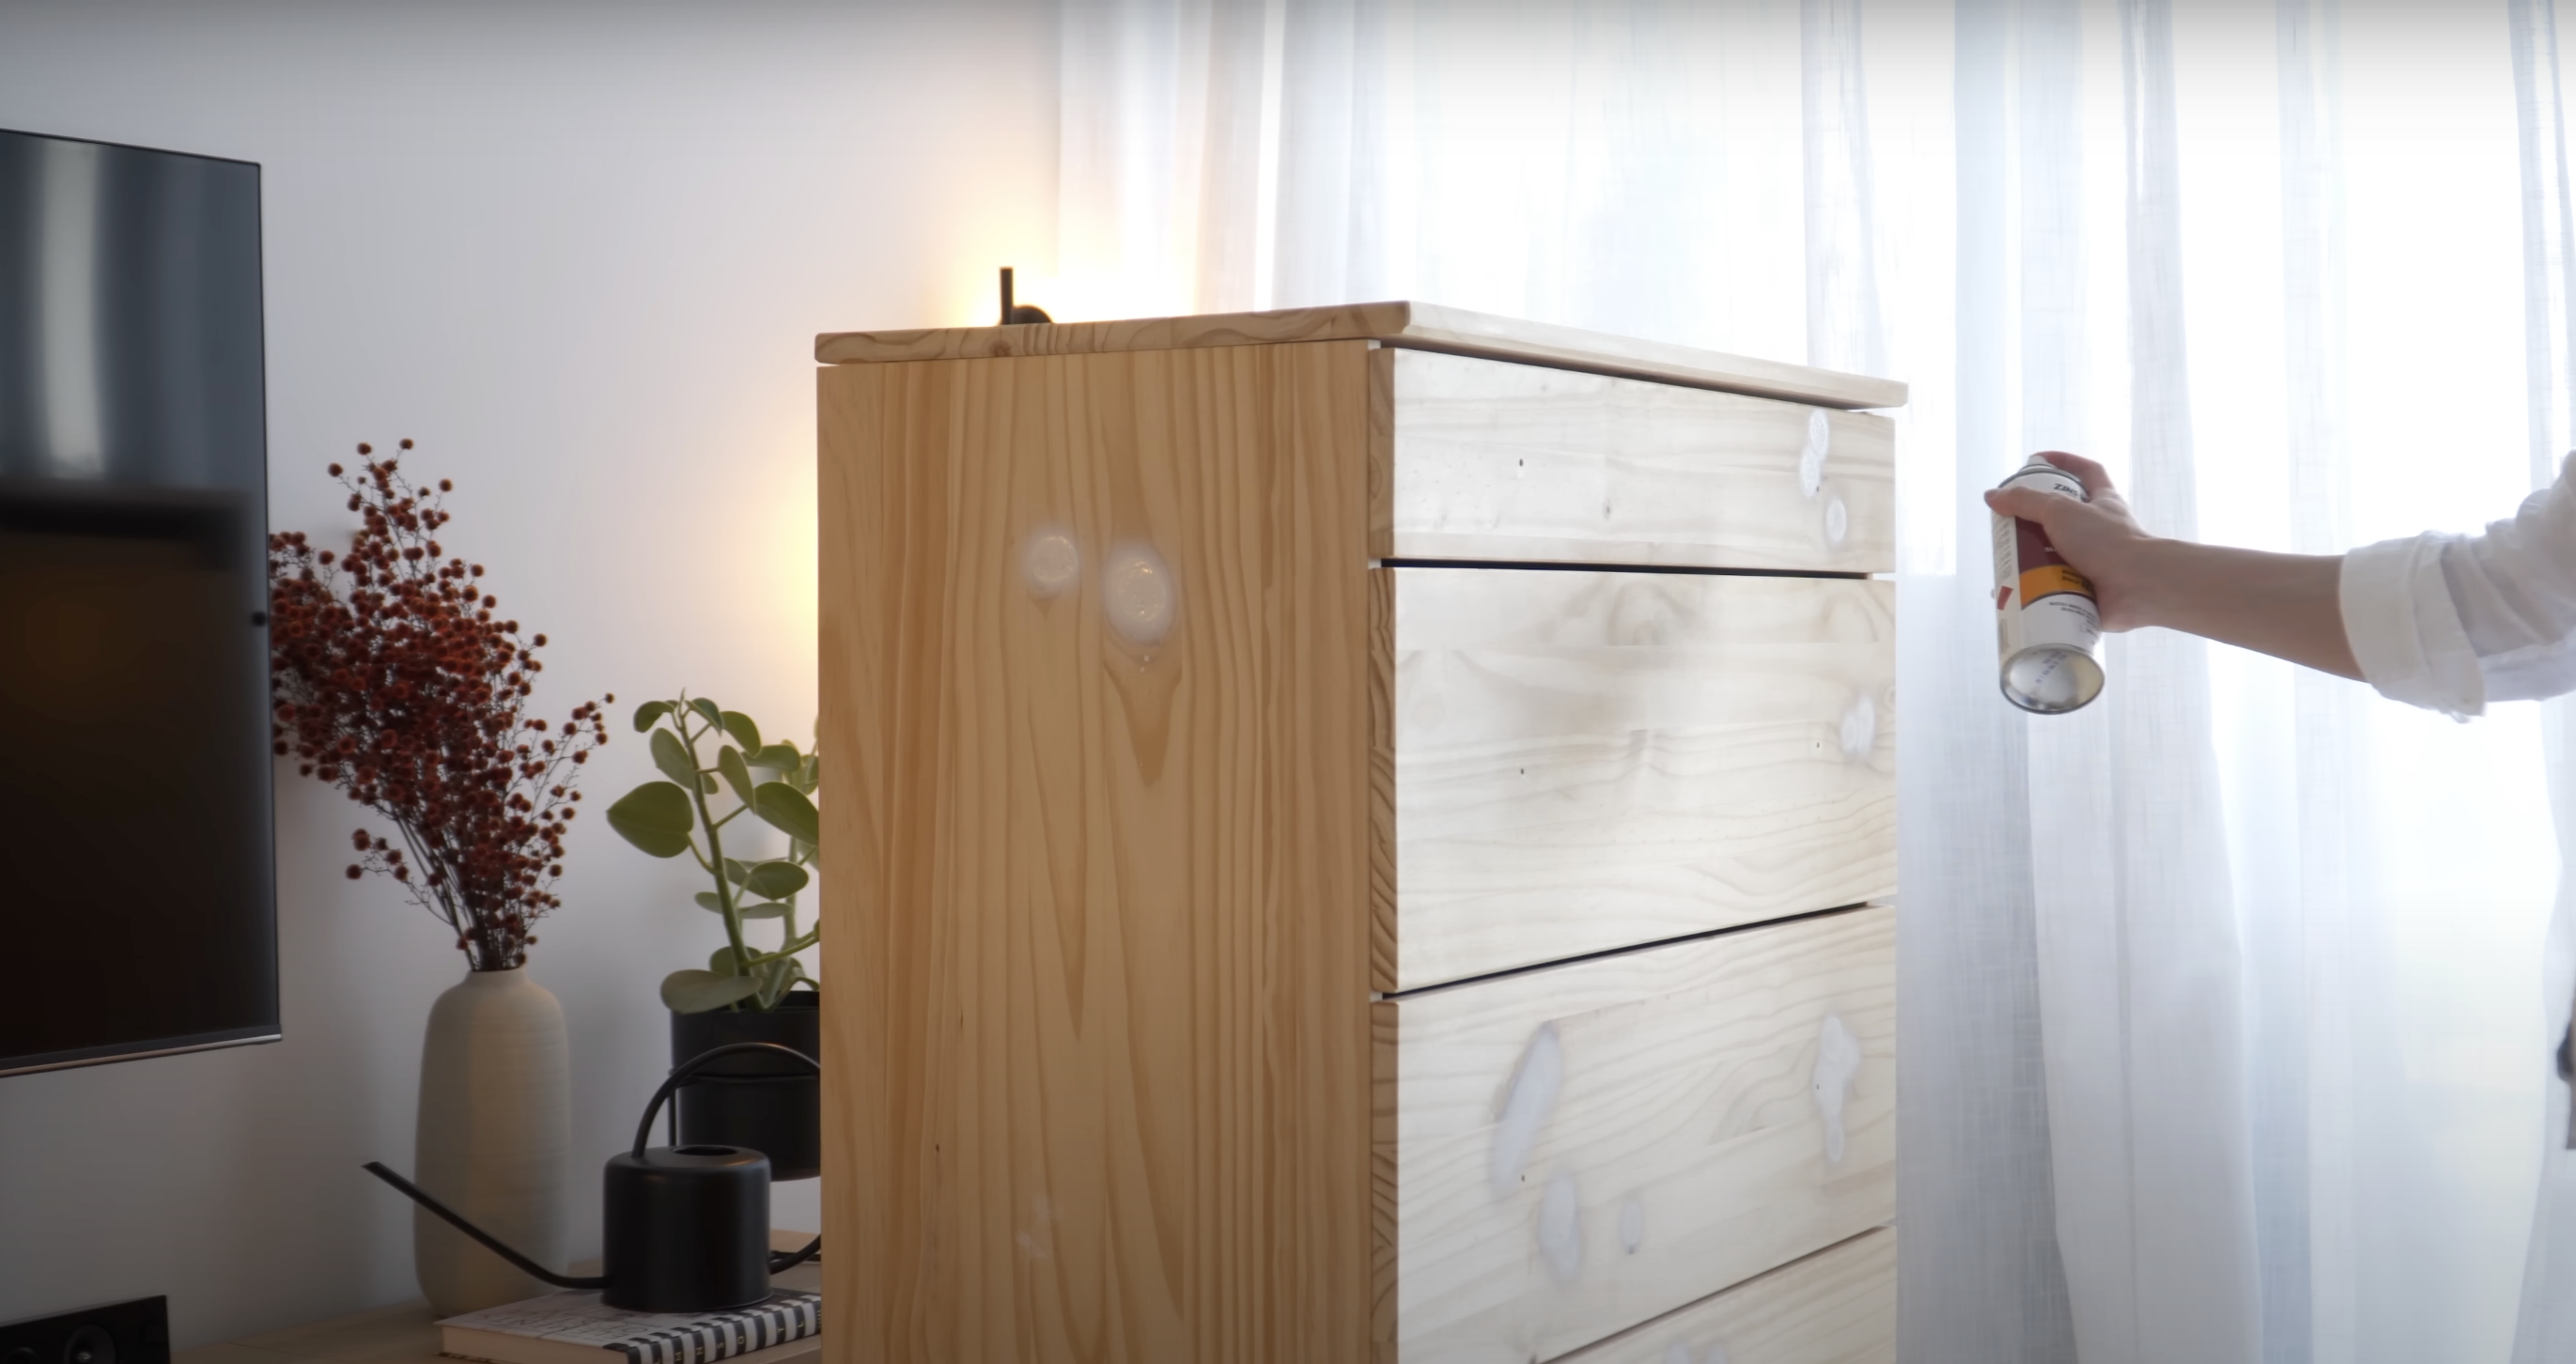
To prevent wood knots from bleeding through, applying primer is crucial.
- Use a shellac-based primer (such as Zinsser) to cover the knots and any other exposed areas.
- Wait for it to dry. If you notice raised grain, lightly sand and apply a second coat.
- Prime the rest of the surface using a water-based primer for an even base coat.
Key Considerations:
A shellac-based primer is necessary to seal knots and prevent yellowing over time.
If working indoors, opt for water-based primer to reduce fumes.
Step 3: Painting the Dresser
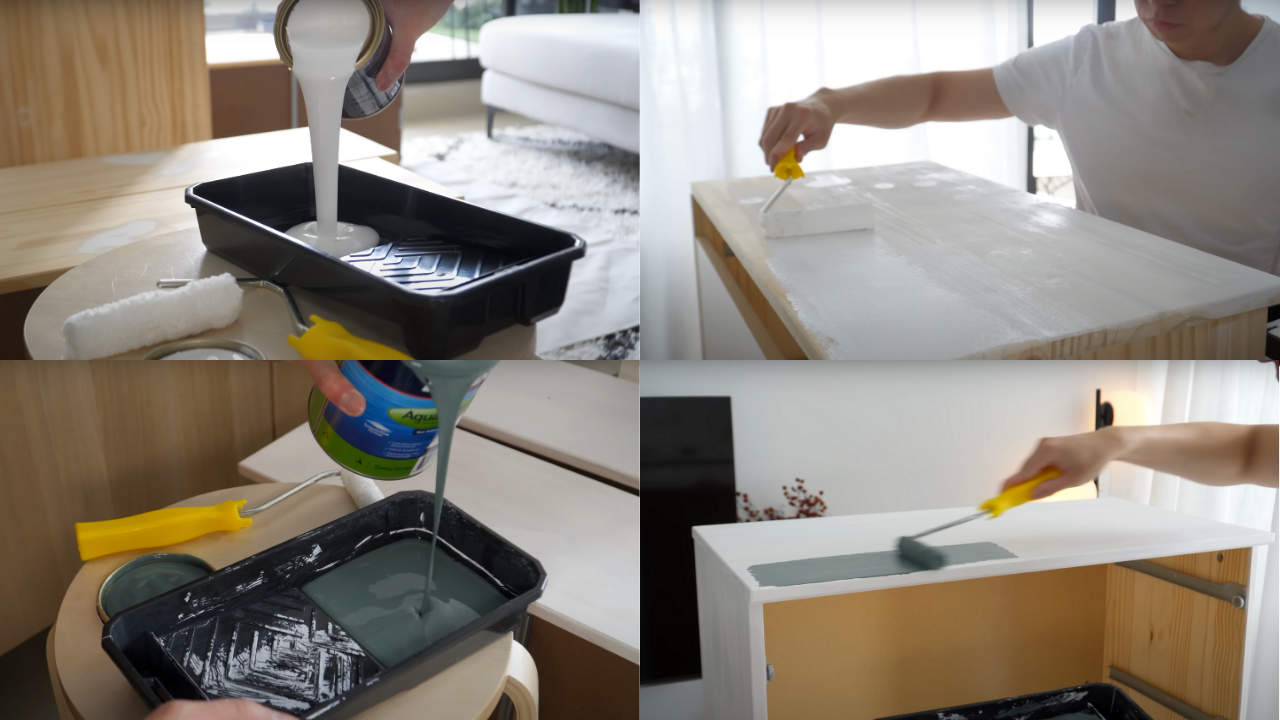
Now that the dresser is primed, it’s time to apply the final paint color.
- Use a paint roller and brush to apply thin, even coats of Dulux Aqua Enamel paint in “Angry Ocean” (semi-gloss finish).
- Apply multiple thin coats instead of one thick coat to avoid drips and long drying times.
- Let each coat dry completely before applying the next one.
- A total of three coats were applied for a smooth, even finish.
Key Considerations:
Patience is key—thin coats dry faster and give a professional finish.
Choose a durable paint like aqua enamel for high-use furniture.
Step 4: Prepping & Painting the Dresser Legs
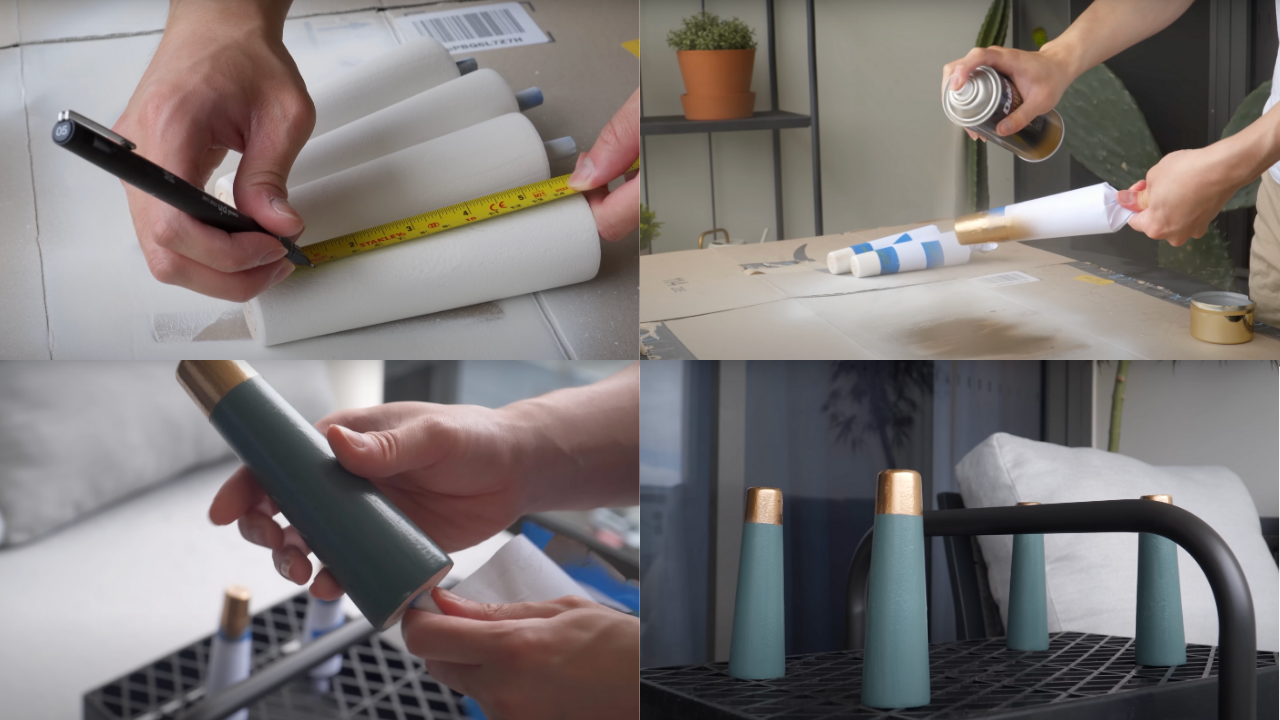
The legs add an elevated, elegant look and feature a gold tip accent.
- Mark the tips of the legs using painter’s tape to create a sharp edge for the gold accent.
- Paint the legs the same color as the dresser and let them dry.
- Once dry, cover the painted portion with tape and spray-paint the tips with Dulux Duramax Bright Gold spray paint.
- Apply two coats of gold spray paint, allowing at least one hour of drying time between coats.
Key Considerations:
Use painter’s tape to ensure clean, crisp edges for the gold detail.
Gold accents add luxury and contrast against the dark paint color.
Step 5: Attaching the Legs & Hardware
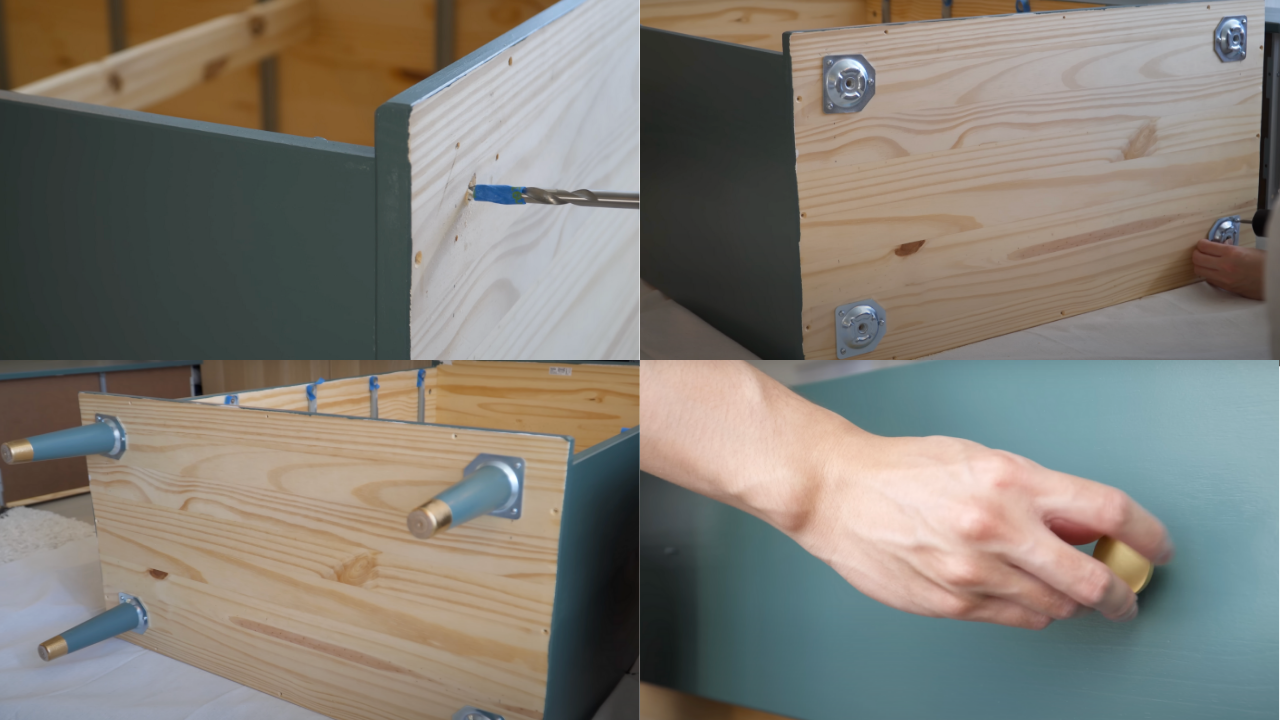
With all painting done, it’s time to assemble the dresser with the new legs and knobs.
- Lay the dresser on its back to attach the leg plates.
- Mark pilot holes for the plates and use a drill to pre-drill the holes.
- Screw in the leg plates and attach the legs securely.
- Drill pilot holes for the knobs, then attach brass knobs to the drawers using the existing IKEA holes.
Key Considerations:
Mark drill depth with painters tape on your drill bit to avoid drilling through the wood.
Always repeat hardware finishes (e.g., gold knobs + gold leg accents) for a cohesive look.
Step 6: Final Assembly & Reveal
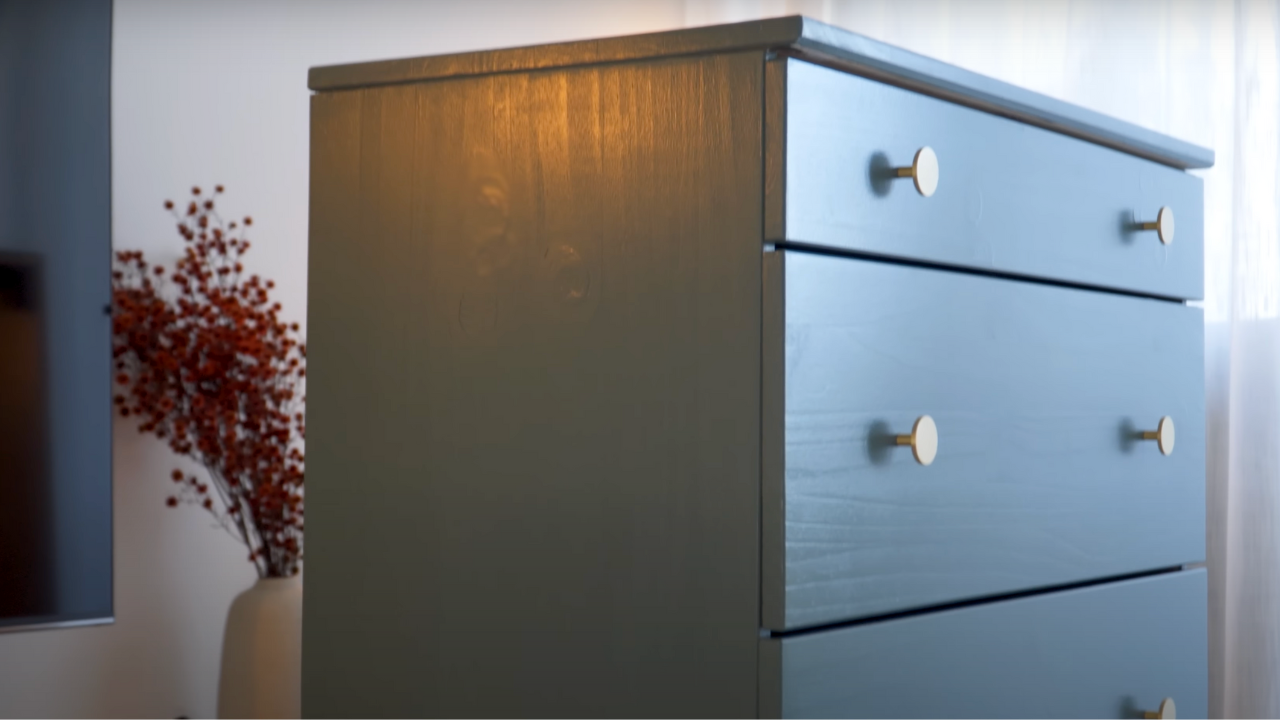
After attaching all the hardware, the dresser is complete!
- Insert all drawers back into the frame and ensure they glide smoothly.
- Wipe down the entire piece to remove any dust or fingerprints.
- The final result is a beautiful, high-end dresser featuring a bold paint color, brass detailing, and a polished finish.
Key Considerations:
The gold tip on the legs complements the brass knobs, creating a cohesive aesthetic.
Before & after photos highlight the transformation from a basic IKEA dresser to a designer-inspired piece.
Watch How It’s Done: DIY Window Painting IKEA Dresser Video Tutorial
Check out the video below by ‘@Reynard Lowel‘ for a step-by-step guide on DIY IKEA Hack.
Maintenance & Care Tips
To ensure your newly painted dresser lasts for years, follow these maintenance tips:
- Use a soft cloth to wipe down the surface regularly to prevent dust buildup.
- Avoid harsh cleaners that can damage the paint—stick to mild soap and water.
- Use felt pads under decorative items to prevent scratching.
- Touch up paint when needed—keep a small jar of the paint color for future fixes.
- For added protection, apply a clear polyurethane topcoat if the dresser will be used in a high-traffic area.
Conclusion
A painted IKEA dresser represents the perfect blend of budget-friendly practicality and personal expression.
The beauty of this project lies in its accessibility: with basic tools, quality materials, and patient attention to detail, anyone can achieve professional-looking results.
As trends change or your style change, you can simply repeat the process with a fresh color or finish, making your IKEA dresser one of the most versatile and sustainable furniture investments in your home.
Have you painted an IKEA dresser before?
Which model did you transform, and what colors or techniques did you use?
Share photos of your finished project in the comments—we’d love to see your creative transformations!