Finding the right primer for your cabinet project can be overwhelming. I know this because I spent hours testing different products on my kitchen cabinets, trying to achieve a smooth and durable finish.
Through trial and error, I realized how important it is to choose the correct primer from the start. The right choice can mean the difference between a surface that holds up for years and one that starts peeling in just a few months.
In this guide, I will share everything you need to know to get the best results. You’ll learn what makes a good cabinet primer effective, the different types available, and when to use each one.
I’ll also explain the correct way to apply primer, highlight the top products professionals recommend, and help you avoid common mistakes that could ruin your project.
With the right approach, you can achieve a flawless and lasting finish from the very first coat.
Why Does Priming Matter?
Painting cabinets without primer is like building a house without a foundation. Primer creates a strong bond between your cabinet surface and paint. Without it, even the most costly paint will chip away in a few months.
A good primer fills tiny pores in the wood and creates a smooth base for paint. This helps your finish look more even and reduces the number of paint coats needed.
Cabinet primers also block stains from tannins in wood that can bleed through paint. This is particularly important with oak or maple cabinets that have strong natural oils.
Most importantly, primer adds years to your paint job. Kitchen cabinets face daily use, moisture, and cleaning. The right primer ensures your fresh paint withstands these tests.
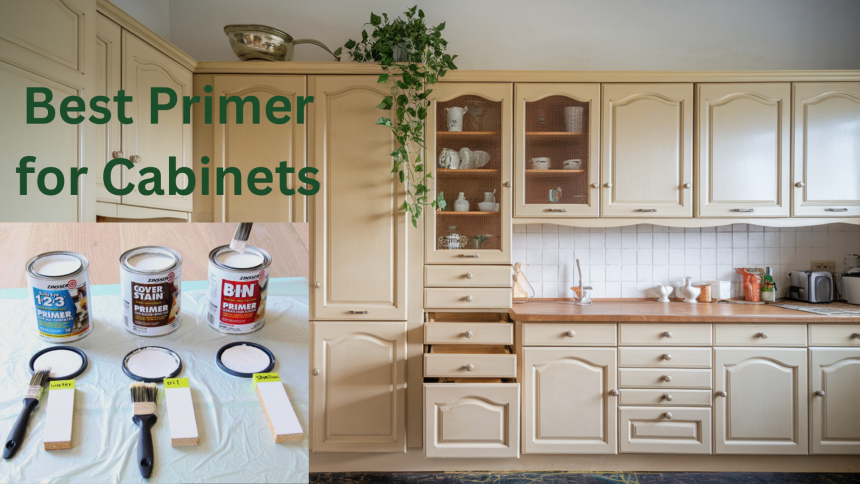
Top 3 Primers for Cabinets
BIN Shellac Primer

BIN Shellac Primer is the best choice for cabinet projects. It sticks to almost any surface without much prep work, and the shellac formula dries in just 20 minutes, speeding up your project time.
This primer blocks stains from wood knots and tannins better than most other products. It also seals in odors, perfect for older cabinets that might have absorbed cooking smells.
While it has a strong smell during application, this fades quickly after drying. The result is a hard, smooth surface that paint will stick to for years.
Zinsser Cover Stain

For painters watching their budget, Zinsser Cover Stain offers great value. This oil-based primer costs less than shellac options while still providing strong adhesion to cabinet surfaces.
Cover Stain takes longer to dry than shellac primers—about an hour between coats. However, it sands easily once dry, which helps create a very smooth base for your paint.
This option works well on both raw wood and previously finished surfaces. The thicker consistency helps fill small imperfections in older cabinets.
Water-Based Adhesion Primer

For those working in small spaces or with limited ventilation, a water-based adhesion primer is the best choice. These primers have an animal smell and can be cleaned up with soap and water.
While not as strong at blocking stains as shellac or oil-based options, modern water-based primers still provide good adhesion. They also dry quickly and produce less harmful fumes.
The trade-off is that water-based primers may require more surface prep, including thorough cleaning and light sanding, to ensure proper adhesion.
Primer Selection Based on Your Cabinet Type
Wood Cabinets
Raw wood cabinets absorb primer unevenly, which can lead to blotchy results. For these cabinets, apply a thin first coat of primer, let it dry fully, then sand lightly before adding a second coat.
Oak cabinets need special attention due to their open-grain pattern. Use a high-solids primer that can fill these pores for a smoother finish. Two coats are often required.
Pine and other softwoods contain sap that can bleed through paint. Only shellac-based primers like BIN can fully block these stains, making them the top choice for pine cabinets.
Laminate Cabinets
Laminate presents a slick, non-porous surface that regular primers struggle to grip. For these cabinets, use a bonding primer specifically made for glossy surfaces.
Before priming the laminate, clean the surface with a degreaser and scuff it lightly with fine sandpaper. This creates tiny scratches that help the primer adhere better.
Apply thin, even coats rather than one thick coat, which can peel away from the smooth laminate surface. Allow extra drying time between coats.
Previously Painted Cabinets
When working with already-painted cabinets, check if the existing finish is oil-based or water-based. For oil-based paint, you’ll need to use a bonding primer to help the new finish stick.
Clean cabinets thoroughly with a degreasing cleaner to remove built-up kitchen grease. Sand glossy finishes until they look dull before applying primer.
If the old paint is peeling or chipping, you may need to strip it completely. Otherwise, a good bonding primer can often go directly over existing sound paint.
Types of Primers and Which One Is Best for You
Choosing the right primer type can make or break your cabinet project. Each has specific strengths that work better for certain situations. I tested all four types when renovating my kitchen, and the differences were clear in both application and results.
Oil-Based Primer
Oil-based primers create an extremely durable foundation for cabinet paint. These thick formulas stick tenaciously to most surfaces and effectively block stains.
Oil primers’ main benefit is their hardness once dry. They resist scratches and create a tough barrier that helps paint withstand years of kitchen use. They also sand down to a very smooth finish.
The downsides include strong odors that linger for days, slow drying time (usually 24 hours), and cleanup that requires mineral spirits. For homes with kids or pets, the fumes might force you to find alternative sleeping arrangements during the project.
Best used for: Raw wood cabinets, cabinets with water damage or stains, and cabinets that will face heavy use.
Water-Based Primer
Water-based primers offer the easiest application experience for soap-and-water cleanup. They dry quickly, usually within 1-2 hours, allowing you to move faster through your project.
These primers have a minimal odor, making them ideal for homes where strong smells are a concern. Many newer formulas also have low or zero VOCs (volatile organic compounds).
The trade-off is somewhat weaker adhesion to glossy surfaces and less effective stain blocking. When using water-based primers, you may need extra prep work or additional coats.
Best used for: Already painted cabinets in good condition, MDF cabinets, or situations where odor and cleanup ease are priorities.
Shellac-Based Primer
Shellac primers stand out for their lightning-fast dry times and superior stain blocking. A coat of shellac primer can often be ready for sanding in just 30-45 minutes.
These primers seal wood knots, smoke damage, and water stains better than any other option. They also stick to nearly any surface with minimal preparation.
The downside is a very strong odor during application and the need for denatured alcohol for cleanup. Shellac primers tend to be thinner and more watery, which can cause drips if you’re not careful.
This method is best used for older cabinets with stains or odors, wood with knots, or projects where time is critical.
Adhesion Primers
Adhesion primers are specially formulated to stick to slick, hard-to-paint surfaces that other primers might fail on. They create a tight bond to materials like laminate, melamine, glass, and metal.
These specialized primers often combine the benefits of water-based formulas (lower odor, easier cleanup) with enhanced sticking power for troublesome surfaces.
The compromise is they may not block stains as well as oil or shellac primers. For stained surfaces, you might need to use a stain-blocking primer first, then the adhesion primer.
It is best used for Laminate cabinets, glossy painted surfaces, melamine, or any very smooth material that regular primers struggle to grip.
Mistakes to Avoid While Applying Primer
| Mistake | Why It Happens | Consequences | How to Avoid |
|---|---|---|---|
| Skipping the sanding step | It seems time-consuming and messy | Paint fails to adhere and peels within months | Light sanding with 220-grit paper creates tiny scratches. Primer can grip for – just 10-15 minutes per cabinet. |
| Using the wrong primer for the surface | Not knowing which primer works with which material | Poor adhesion, stain bleed-through, or paint failure | Match primer to your cabinet material – shellac for wood with knots, bonding primer for laminate |
| Applying primer too thick | Trying to save time with one thick coat | Drips, uneven texture, and longer dry times | Apply 2-3 thin coats instead of one thick layer. Thin coats dry faster and create a smoother finish. |
| Not allowing enough drying time | Rushing to finish the project quickly | Gummy finish, poor adhesion, and trapped solvents | Follow the time on the can, plus add an extra hour in humid conditions – when in doubt, wait longer. |
| Ignoring ventilation when using strong primers | Wanting to finish indoor projects during bad weather | Headaches, dizziness, and potential health issues | Use fans, open windows, take breaks, and wear a respirator mask with proper cartridges. |
Final Thoughts
Selecting the right primer makes the difference between cabinets that look fresh for years and those needing a redo next season. Remember three key points for success:
First, match your primer to your cabinet material – shellac for stained wood, adhesion primer for laminate, and oil-based for maximum durability.
Second, preparation matters just as much as the product. Clean thoroughly, sand lightly, and allow proper drying time between coats.
Third, don’t compromise on quality to save a few dollars. The primer is your foundation – invest in it.
Ready to start your project? Take what you’ve learned here, gather your supplies, and transform those cabinets with confidence.
Your future self will thank you for the time spent getting it right from the beginning.