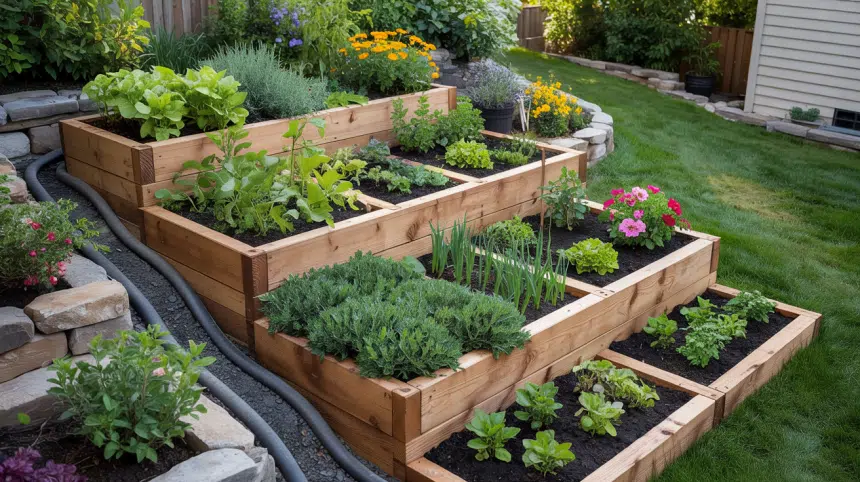
Have you ever looked at that sloped backyard and thought it was just wasted space? Think again! A terraced garden turns challenging slopes into beautiful, productive growing areas that catch the eye and hold the soil.
That steep hill or gentle incline in your yard can become a practical growing space that works with nature, not against it. Those hillside gardens in Italy and Japan? You can build one right in your backyard.
Terracing isn’t just about good looks—it also makes gardening easier on your back, stops soil erosion, and helps water reach your plants evenly. Your neighbours might even stop to ask how you did it.
This guide walks you through creating your terraced garden beds step by step, from planning to planting. With some simple tools and a weekend of work, you’ll turn that tricky slope into the garden you’ve always wanted.
What are Terraced Gardens and their Benefits?
Terraced gardens are created by converting sloped or uneven areas of land into a series of level, flat sections. These sections, or “terraces,” are often supported by retaining walls or other structures to help hold the soil in place.
This technique is commonly used in areas with hilly or sloped terrain, turning an otherwise difficult space into a usable garden. This method offers several key benefits:
-
Improved Drainage: The design allows water to flow evenly across the garden, reducing the risk of waterlogging and ensuring plants receive adequate moisture.
-
Prevention of Soil Erosion: Retaining walls and the stepped layout stabilize the soil, preventing it from washing away during heavy rainfall.
-
Maximized Growing Space: Terraced gardens create multiple planting areas, allowing you to grow more plants on a slope than you could in a traditional garden.
-
Organized and Usable Landscape: The tiered design turns uneven land into a structured, manageable space, making it easier to plant and maintain your garden.
Materials Required
| Material | Purpose |
|---|---|
| Pressure-treated landscape timber | Used to build the retaining walls for each terrace row. |
| Paver base | Provides a stable foundation for the landscape timbers and ensures level placement. |
| Perforated drainage pipe | Allows proper water drainage through the terrace beds to prevent water buildup. |
| Gravel | Helps with drainage around the pipe and prevents clogging of the drainage system. |
| Landscape fabric | Prevents soil and debris from entering the drainage pipe and maintains its functionality. |
| Rebar | Used to secure the timber in place and prevent shifting of the terrace walls. |
| Garden soil | Fills the garden beds, providing proper growth conditions for the plants. |
| Low-maintenance plants | Chosen based on shade requirements and local climate to thrive in the garden beds. |
Step-by-Step Guide to Creating Terraced Garden Beds on a Slope
Follow the process to turn an unused or challenging slope into a functional and attractive space for your garden, ensuring proper drainage and a sturdy structure for years of growth.
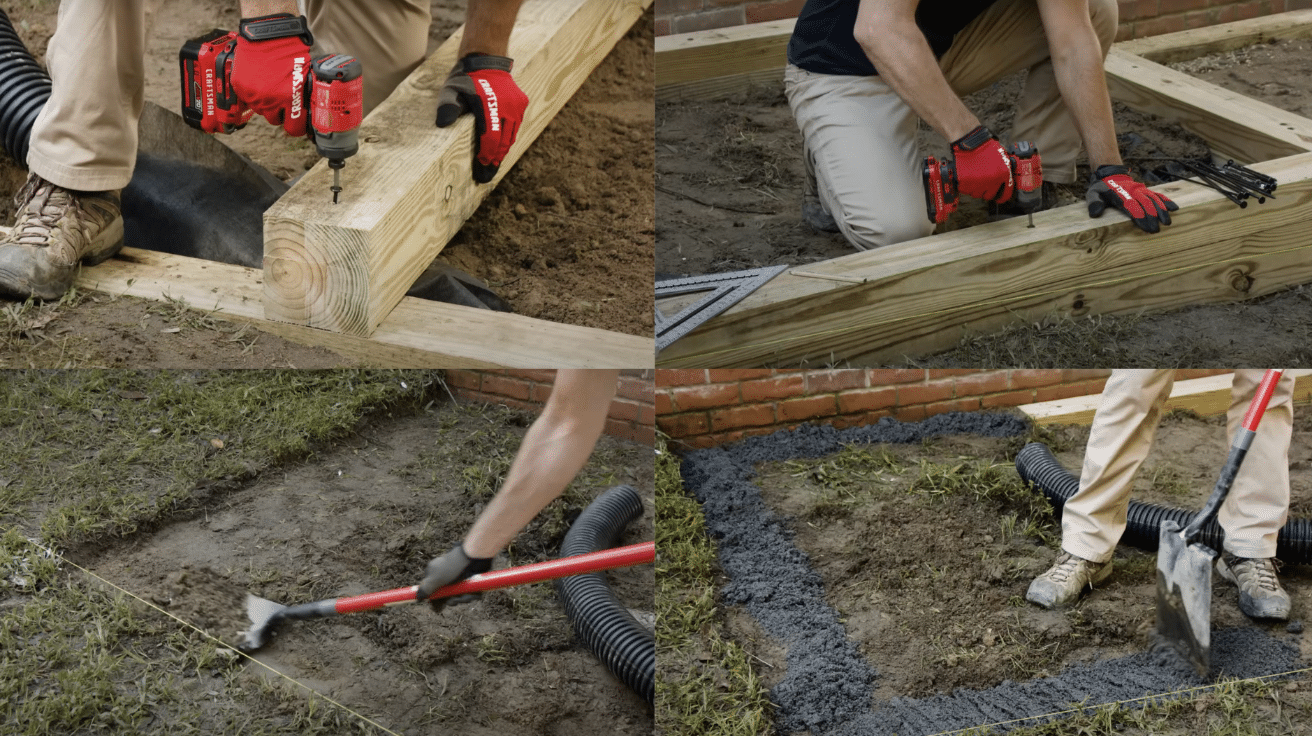
Step 1: Plan and Mark Out the Terrace
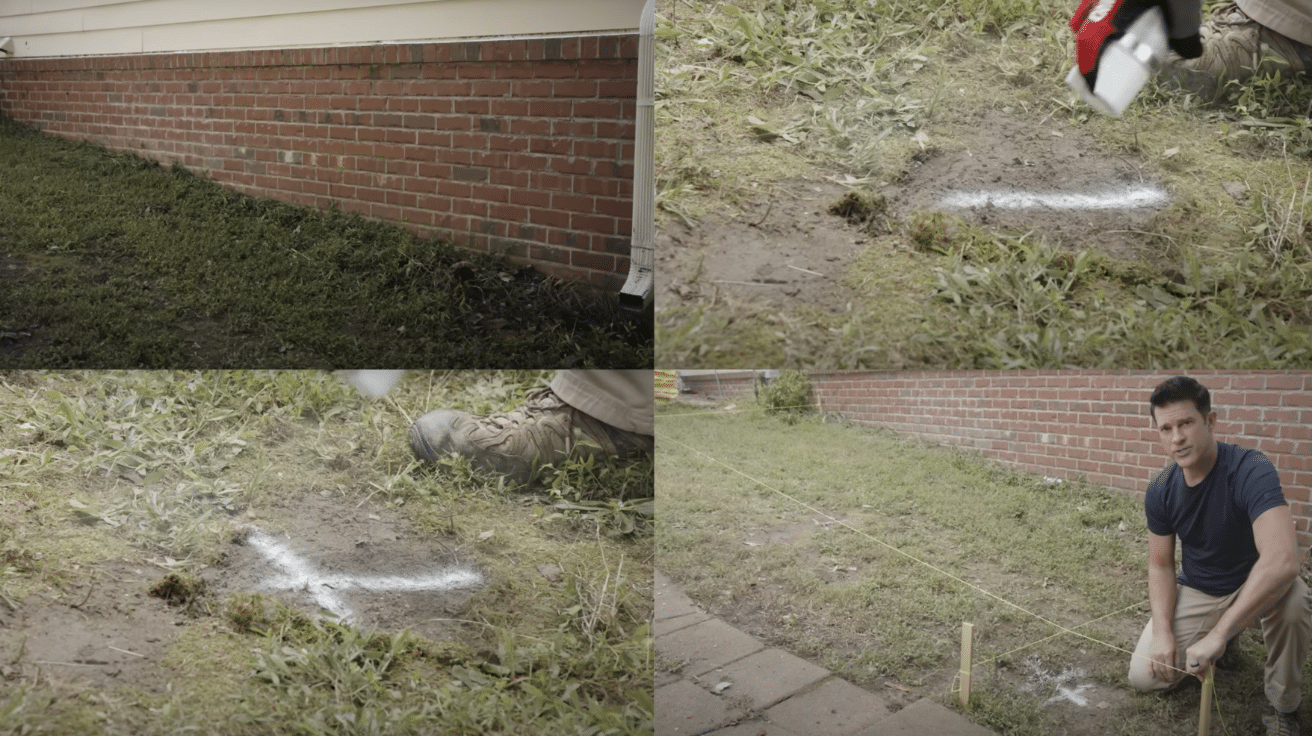
- Select the area for your terrace and outline its location with clear markers.
- Divide the marked area into equal sections based on the number of garden beds you wish to create.
- Measure and confirm the terrace length is appropriate for your slope, e.g., 18 feet with 3 equal sections.
- Use flashing or waterproof paint on existing siding if needed to prevent water damage around the terrace.
Pro Tip: Make sure the terrace outline is perfectly straight and level using a long measuring tool to ensure even garden beds.
Step 2: Dig a Trench and Level the Base
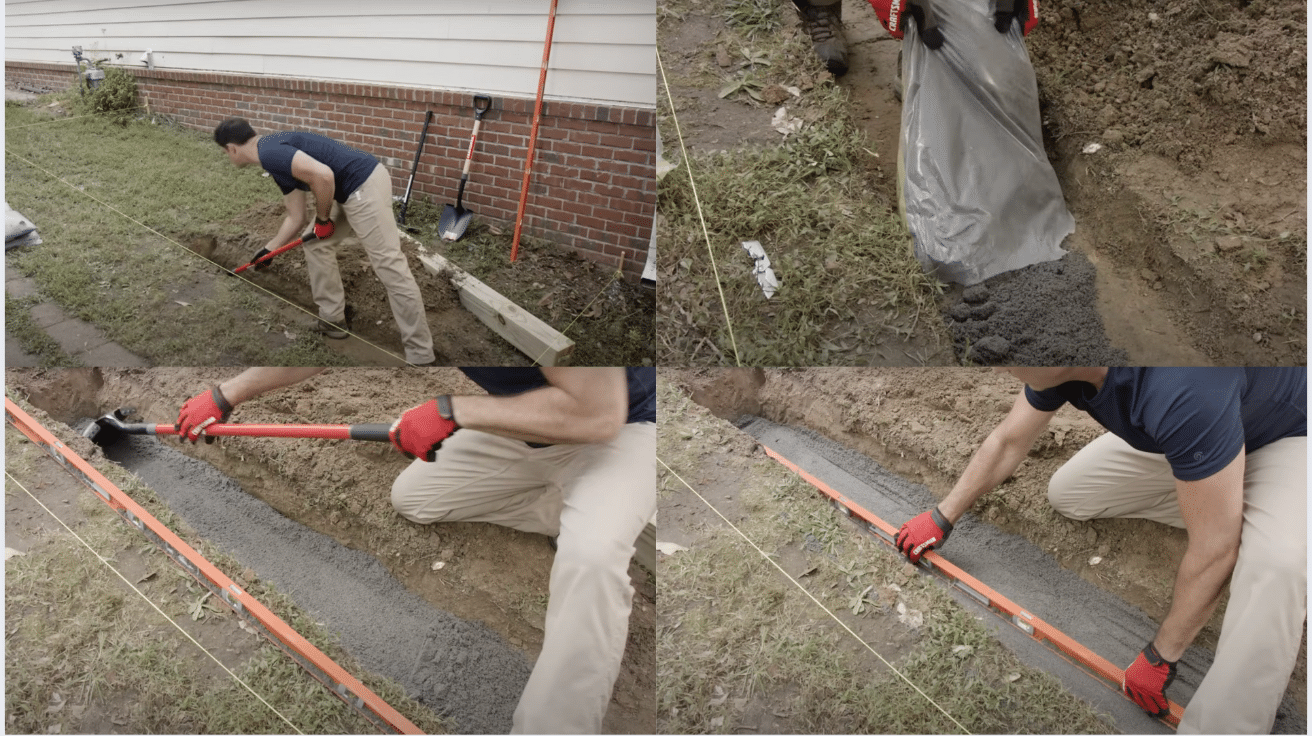
- Dig a trench along the bottom of the slope to place the first row of landscape timber securely.
- Lay a paver base into the trench and level it carefully with a long level to create a solid foundation.
- Set the landscape timber into the trench and adjust it using a shovel until it’s perfectly level.
- Tap the timber down with a sledgehammer to secure it firmly in place for the first row of your terrace.
Pro Tip: Start by ensuring the first row is level, as it will serve as the reference for all other rows of the terrace.
Step 3: Install the Drainage System
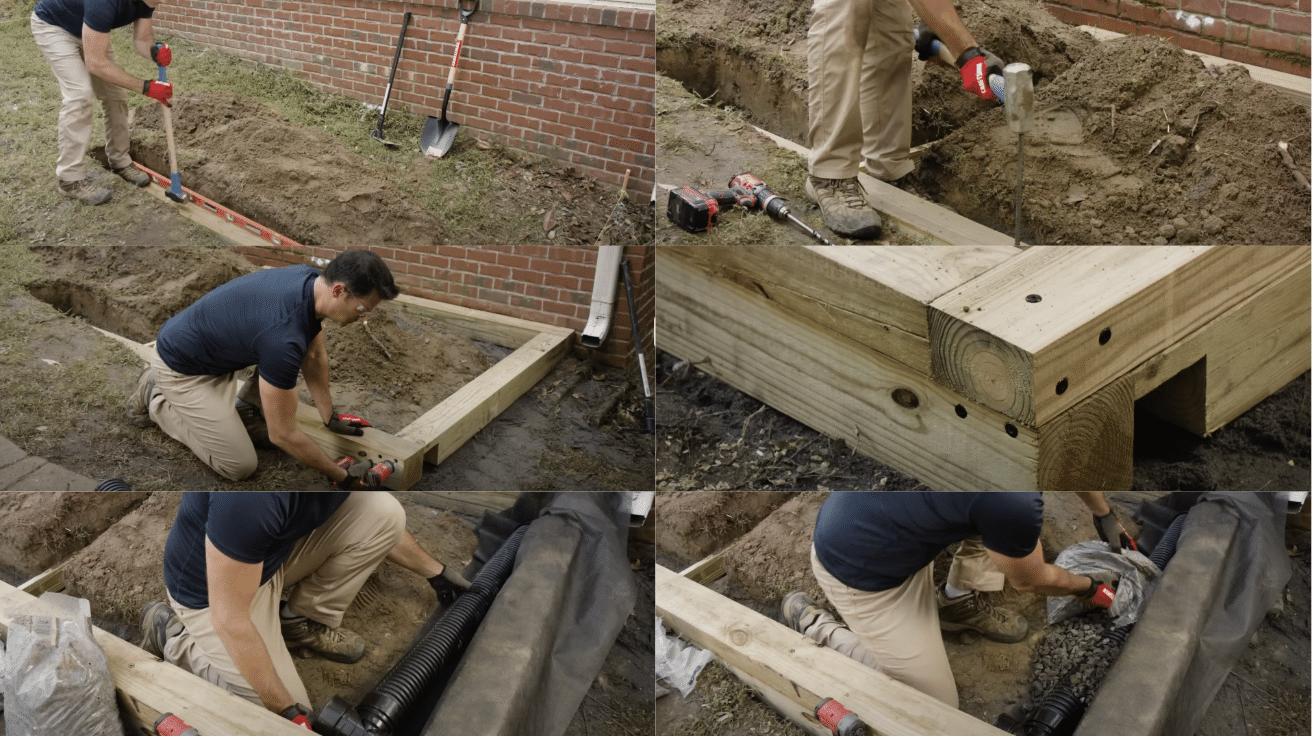
- Drill holes in the timber to run the perforated drainage pipe through and ensure proper water flow.
- Tee the drainage pipe into the sides of the terrace to guide water away from the garden and house.
- Cover the drainage pipe with gravel and wrap it with landscape fabric to prevent soil and debris from clogging it.
- Drive rebar through the timber to securely lock it into place and add stability to your terrace structure.
Pro Tip: Using landscape fabric will prevent soil and debris from entering and clogging the drainage system over time.
Step 4: Build Additional Terrace Rows
- Dig trenches for the next row of timber and repeat the steps of adding paver base and leveling.
- Offset the timber joints to ensure the structure is stable and resistant to shifting over time.
- Lay the perforated drainage pipe over gravel and cover it with landscape fabric for continued drainage.
- Fill each bed with a mix of dirt you’ve dug out and top off with additional garden soil for optimal planting.
Pro Tip: Ensure each row is level before securing it, as uneven rows may lead to an unstable terrace structure.
Step 5: Finalize and Plant Your Garden Beds
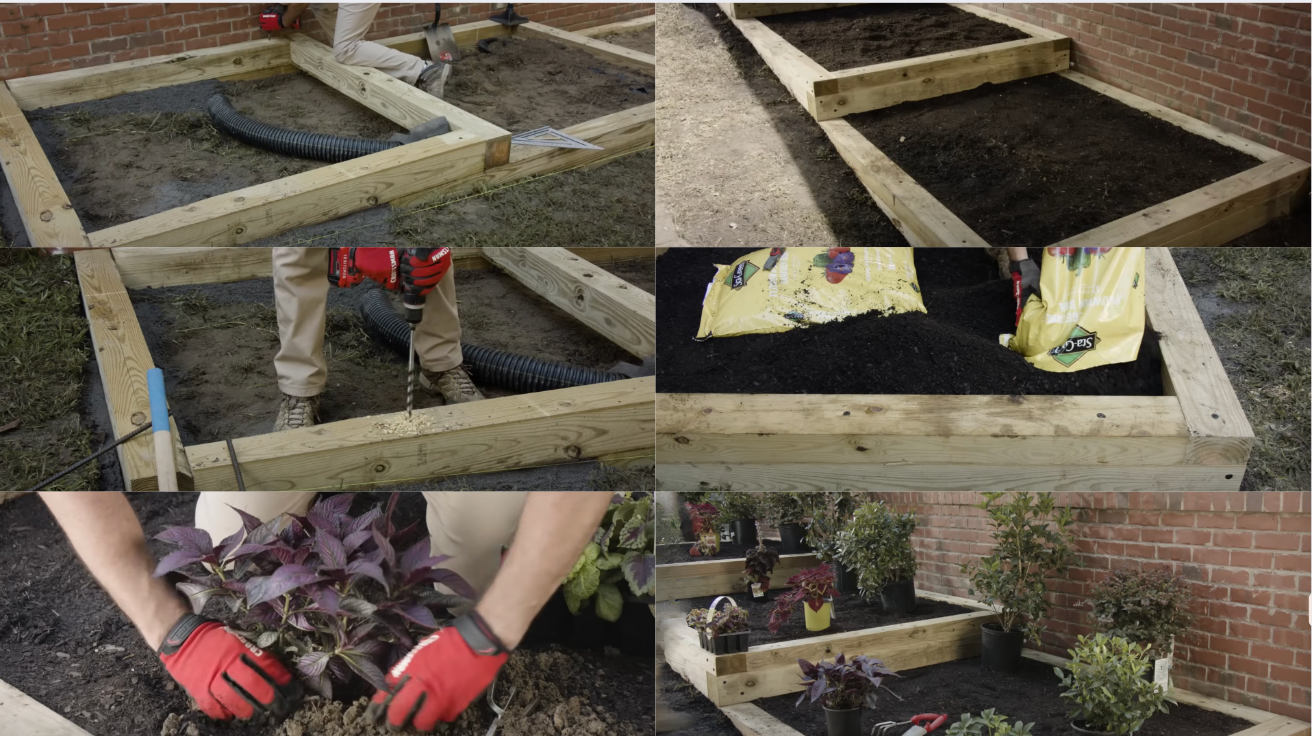
- Once the terracing is complete, fill the garden beds with soil until they’re level with the top of the timber walls.
- Choose plants suited to partial shade and the local climate for better growth and sustainability.
- Use the Lowe’s grow together method to select plants that will thrive when grown together in the same garden bed.
- Water the plants thoroughly and continue to maintain the garden to ensure a healthy, thriving landscape.
Pro Tip: Choose plants based on their sunlight and water needs to create a harmonious environment in your new terraced garden beds.
Watch How It’s Done: DIY Terrace Garden Bed Video Tutorial
Check out the video below by @lowes for a step-by-step guide on DIY Terrace Garden Bed.
Common Mistakes to Avoid
Creating terraced garden beds on a slope can be a rewarding project, but there are common mistakes that can impact the durability and effectiveness of your garden.
By avoiding these errors, you can ensure your terraced beds are functional, stable, and beautiful for years to come.
- Neglecting proper drainage can cause water buildup and erosion.
- Not leveling the walls can make terraces shift or collapse.
- Using untreated wood can lead to quick degradation outdoors.
- Overfilling soil can stress the retaining walls.
- Skipping erosion control can result in soil loss.
- Choosing the wrong plants can prevent them from thriving.
- Forgetting reinforcements can cause timber or stone to shift over time.
Your Slope-to-Garden Success Story
Turning that sloping yard into terraced garden beds takes some sweat, but the rewards are worth every drop.
Your new garden will catch water instead of sending it downhill, keep soil in place, and give you easy spots to grow plants that once seemed impossible on that slope.
Best of all, garden work becomes less backbreaking when you don’t have to bend at odd angles or fight gravity while planting and harvesting. Start small if you need to – even one or two terraces can make a big difference.
Remember that nature works in steps, too – waterfalls, mountainsides, and river banks all form natural terraces over time. By working with your land’s natural shape, you’ve created a garden that grows more beautiful each season.