
Tired of those worn-out stairs that make your home look dated? You’re not alone.
Stairs take a beating every day, and over time, they can become an eyesore in an otherwise lovely house. The good news? You don’t need to spend thousands on professional help to make them look fresh again.
This detailed guide illustrates how to advance your stairs from dull to dazzling without overspending. In just one weekend, using some basic tools and materials from your nearby hardware store, you can achieve a staircase that looks like it belongs in a design magazine.
The best part? This budget-friendly makeover costs a fraction of professional renovation ideas, and the results will have guests asking who did your stairs.
Ready to walk up to something beautiful? Let’s get started!
Why Give Your Stairs a Makeover?
Upgrading your stairs may seem like a small change, but it can have a big impact on your home’s overall feel and functionality. Here’s why it’s worth doing:
-
Boosts visual appeal in your entryway or hallway: Stairs are often the first thing people notice when they walk into your home. A fresh coat of paint, a new finish, or an added runner can instantly make your space look cleaner, brighter, and more stylish.
-
Increases home value with minimal investment: You don’t have to spend thousands to make your home feel updated. A budget stair makeover can improve your home’s appearance and appeal to potential buyers, especially if the original stairs look worn or outdated.
-
Makes stairs safer and easier to maintain: Adding non-slip treads or a runner not only enhances the look, but it also helps prevent slips and falls. Painted or stained stairs are also easier to clean than old carpeted ones.
-
This is a fun weekend DIY project for any skill level:It’s beginner-friendly and doesn’t require heavy tools. Whether you’re painting, adding decals, or installing a runner, it’s a satisfying way to improve your home with your own hands.
What Materials Do You Need for a DIY Stair Makeover?
Before starting your project, make sure you have the right tools and supplies on hand. Here’s a simple list to help you prep for a smooth and budget-friendly stair transformation.
| Material/Tool | Purpose |
|---|---|
| Paint or wood stain | For coloring treads, risers, and railings |
| Peel-and-stick wallpaper or decals | Adds decorative flair to risers without permanent changes |
| Sandpaper | Smooths surfaces before painting or staining |
| Painter’s tape | Helps achieve clean paint lines |
| Paintbrushes or foam rollers | For applying paint or stain evenly |
| Stair runner or carpet remnants | Adds style, comfort, and safety to stairs |
| Staple gun | Secures stair runner in place |
| Utility knife | Trims wallpaper, carpet, or decals precisely |
| Cleaning supplies (cloth, cleaner) | Prepares the stair surface for paint or adhesive |
| Optional: Wood filler | Fills in holes or gaps in stairs before painting |
| Optional: Non-slip pads or strips | Enhances stair safety without affecting style |
How to Do a DIY Stair Makeover
Alter tired-looking stairs into a fresh, stylish focal point without spending a fortune. With some creativity and basic tools, you can upgrade your stairs on a budget in just a weekend.
Step 1: Understand Stair Parts Before You Begin
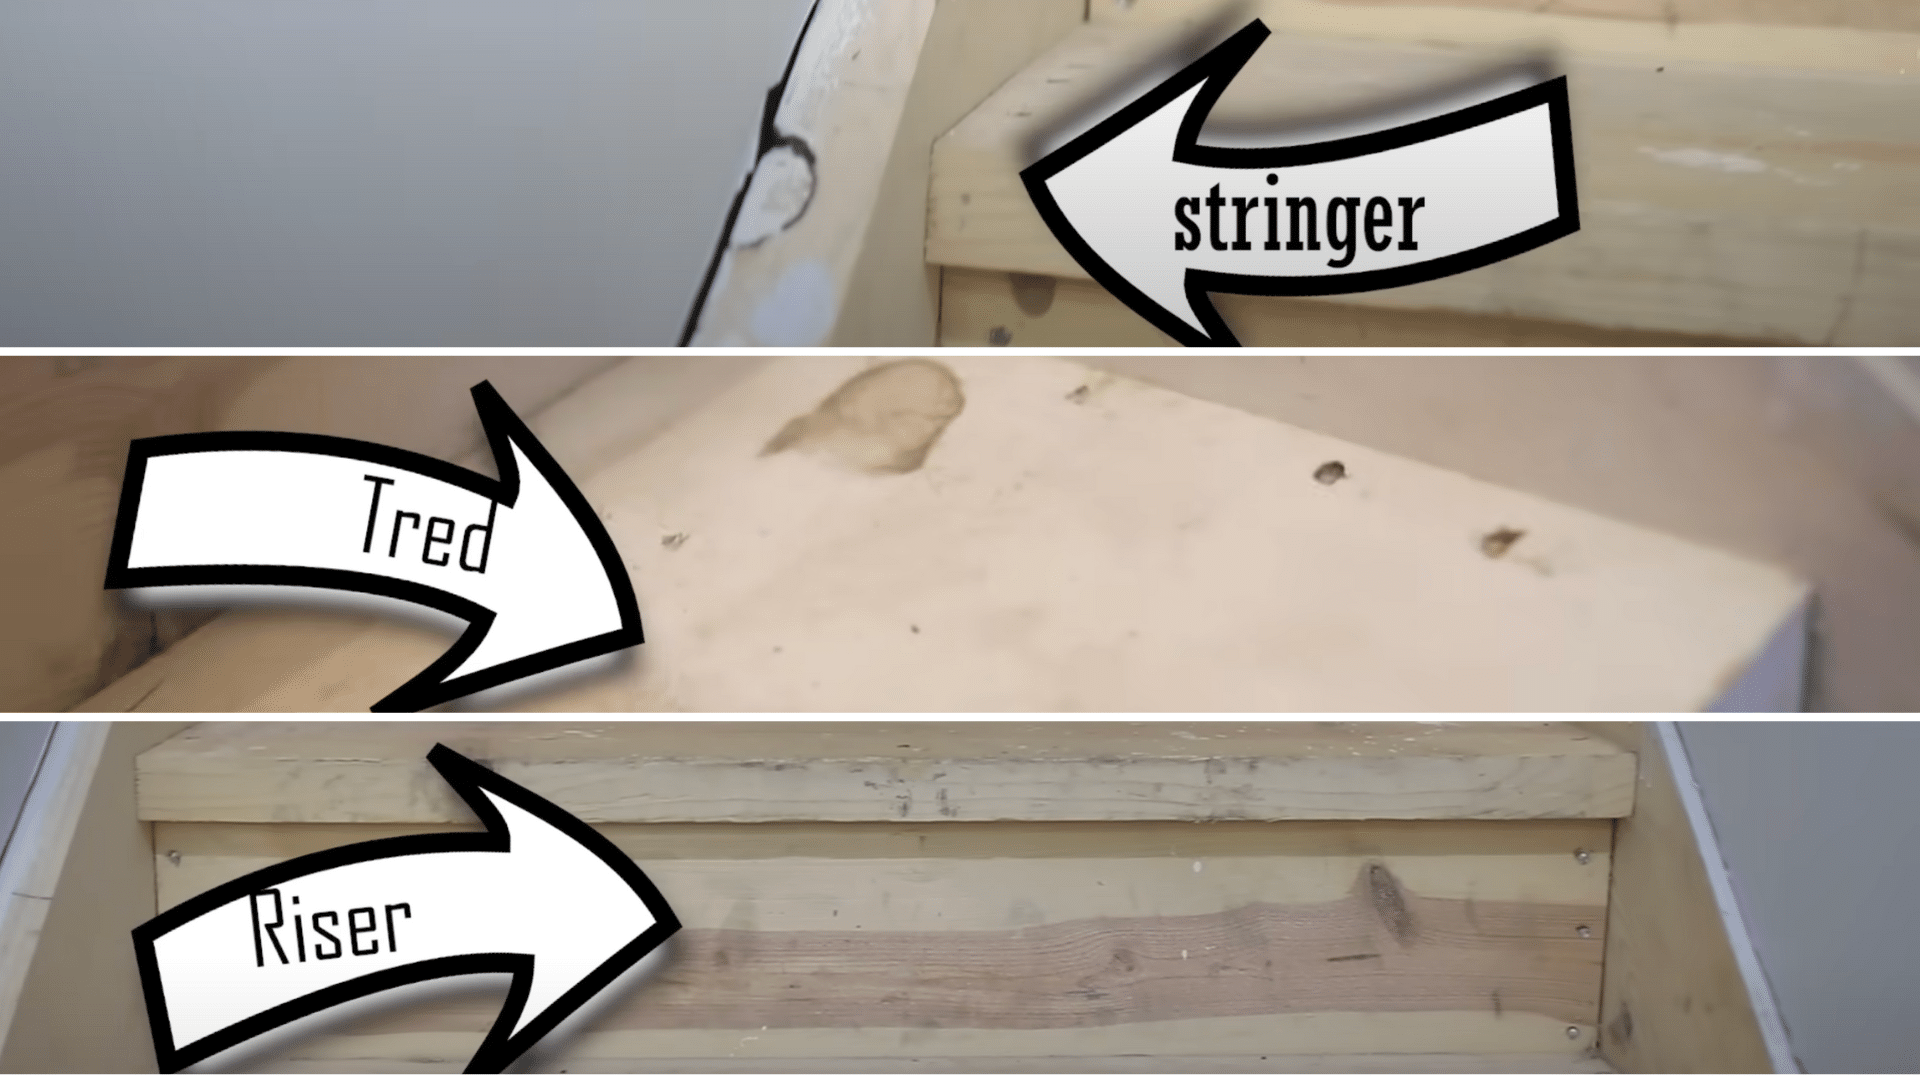
Before jumping into the project, take a moment to understand the basic anatomy of your stairs:
-
Treads: The horizontal surfaces you walk on.
-
Risers: The vertical parts between each tread.
-
Stringers: The side supports that run along the stairs.
Knowing these parts will help you better follow the instructions and communicate measurements and cuts if you’re getting materials pre-cut at a store.
Step 2: Prep the Stairs for the Makeover
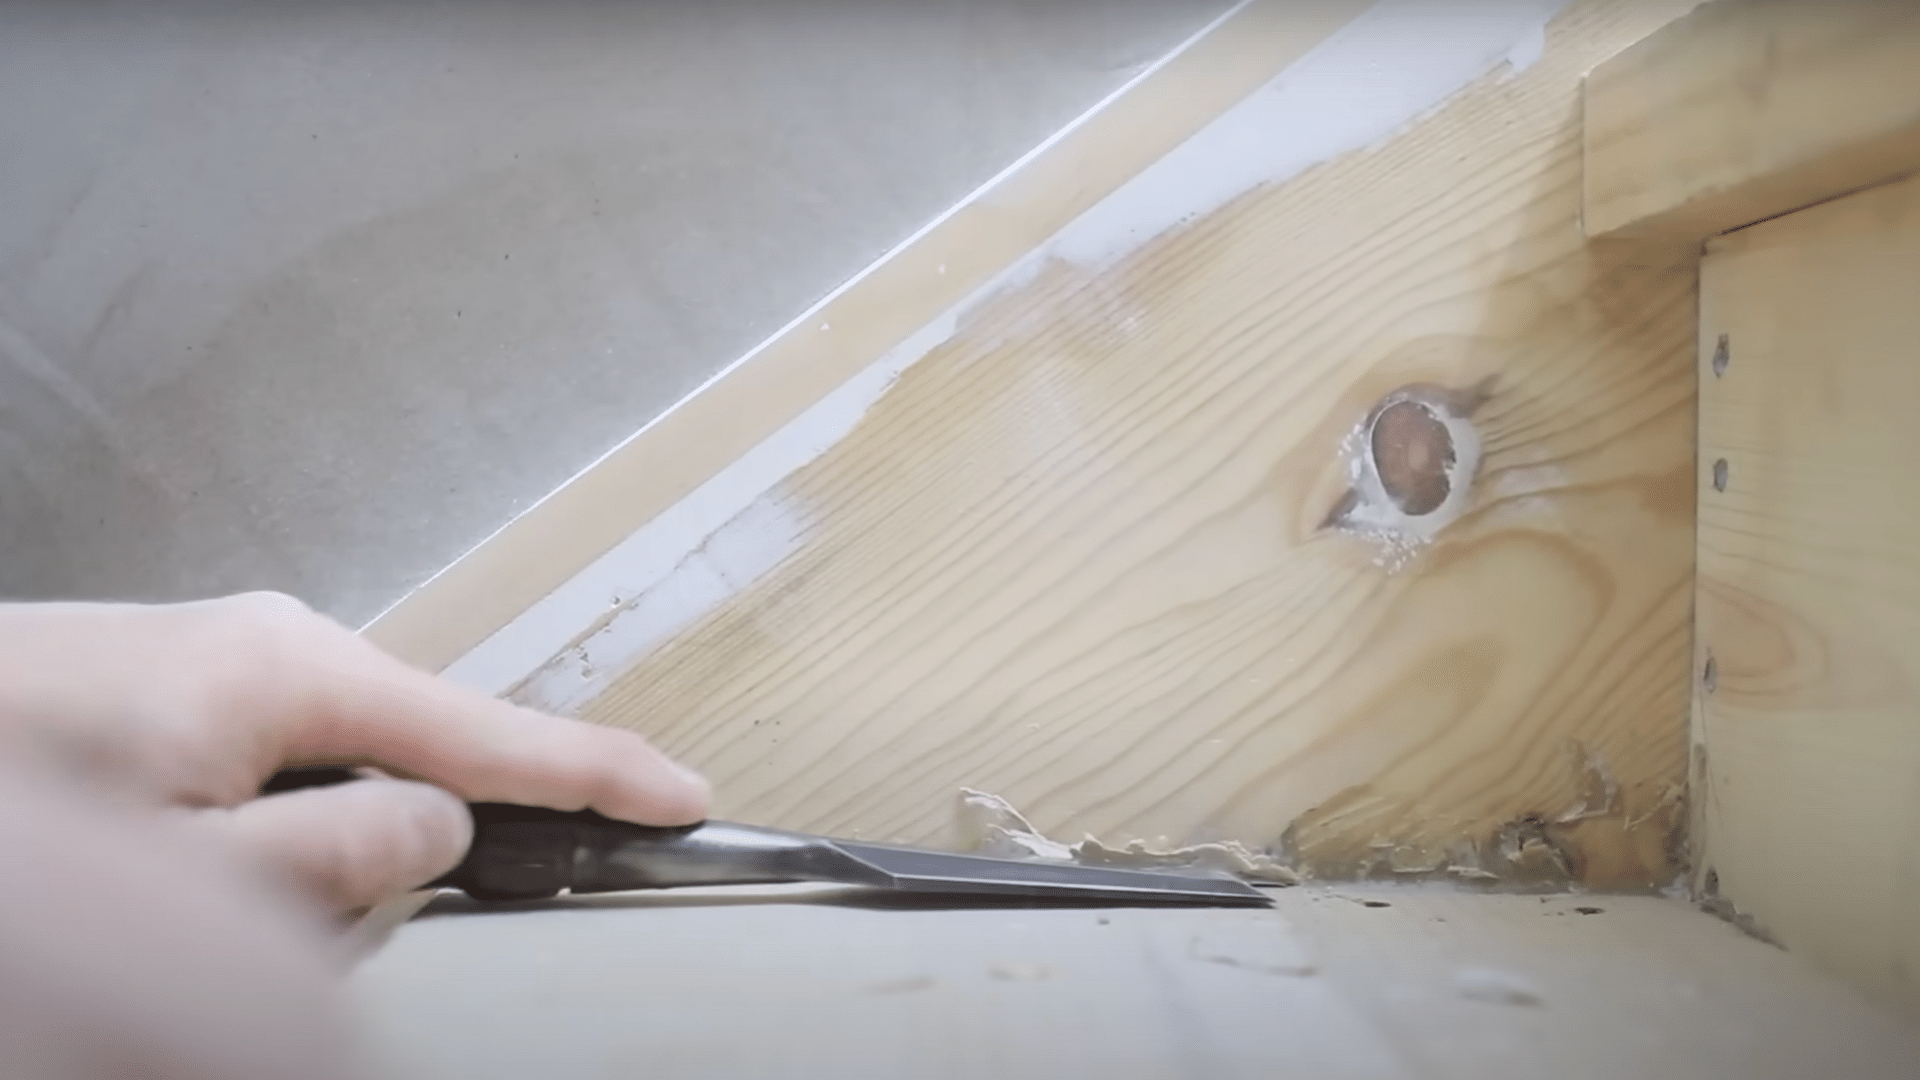
Start by prepping your stairs to ensure everything goes smoothly during installation.
-
Sweep, vacuum, and wipe down every step thoroughly. If there’s any old carpeting or adhesive, remove it completely. Use a 1-inch trim piece to separate the drywall from the stairs for a cleaner edge.
-
Fill in nail holes, knots, and gaps on the stringers with wood filler or spackle. Sand everything smooth with 120-grit sandpaper using an orbital sander or sanding block. Remove old glue or paint residue to create a clean, smooth surface for new materials to stick properly.
This prep step ensures you start with a blank, stable surface and prevents issues later on with adhesion or uneven boards.
Step 3: Trim the Stair Fronts for Bullnose Installation
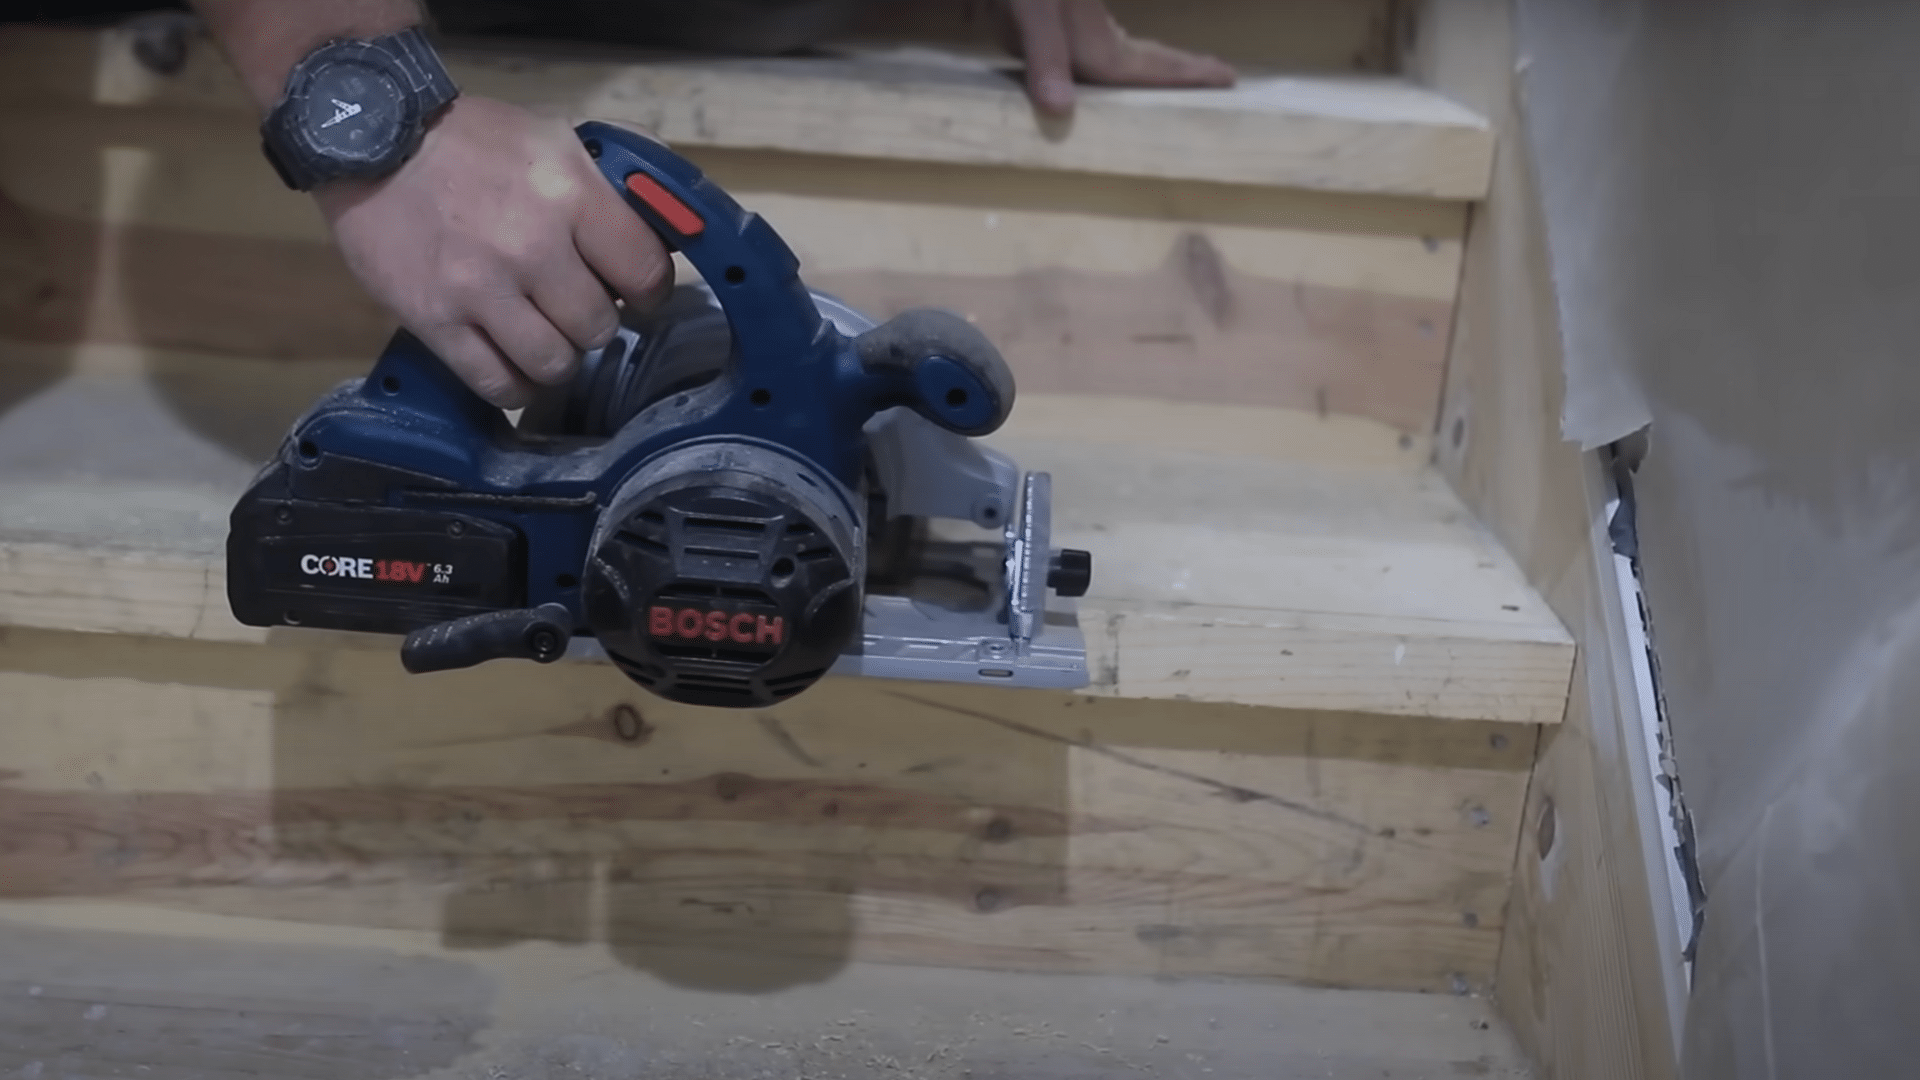
For a clean, flush bullnose (rounded stair edge), you need to trim off a small portion of the stair’s front edge.
-
Mark ¾” from the front of each tread with a pencil. Use a circular saw to cut as far across the front as possible.
-
Finish the cuts with a hand saw or jigsaw, especially near the ends and corners. Remove this cut piece carefully—this gap is where the bullnose trim will be installed.
This step gives you a professional-looking stair edge and avoids layering new wood awkwardly on top of the old tread.
Step 4: Prime the Stair Sides (Stringers)
Painting untreated wood without primer can lead to blotchy or uneven results, so don’t skip this part.
-
Apply a wood primer to all visible areas of the stringers using a brush or roller. Make sure to cover the filled areas well for uniform coverage later. Let the primer dry fully before applying any paint.
Priming helps the paint stick better and evens out the texture of the wood surface for a smooth, durable finish.
Step 5: Cut and Install Plywood Treads
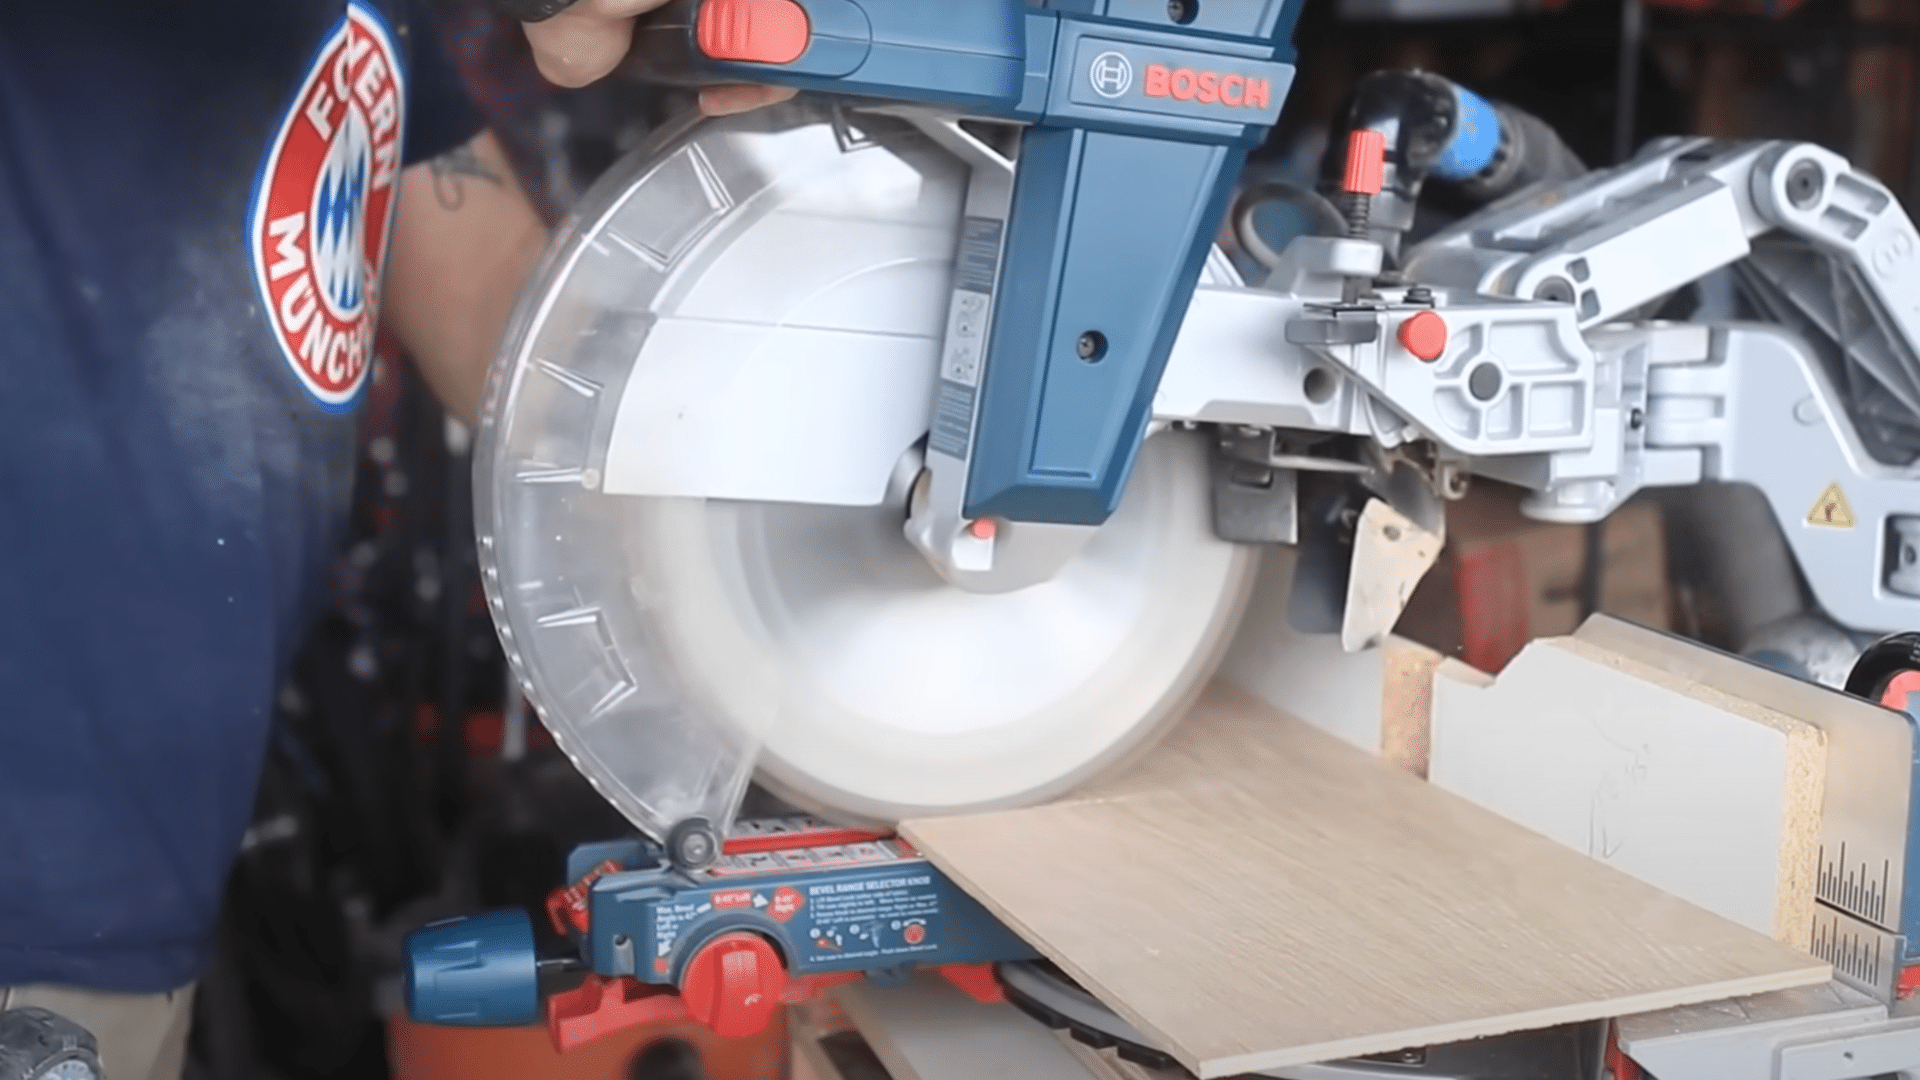
Instead of replacing stair treads with expensive solid wood, use ¼” oak plywood for a cost-effective and stylish alternative.
-
Rip the plywood into tread-sized panels using a table saw. Use a piece from your earlier stair cuts as a size reference. Apply liquid nails adhesive generously on each step, then place the plywood on top.
-
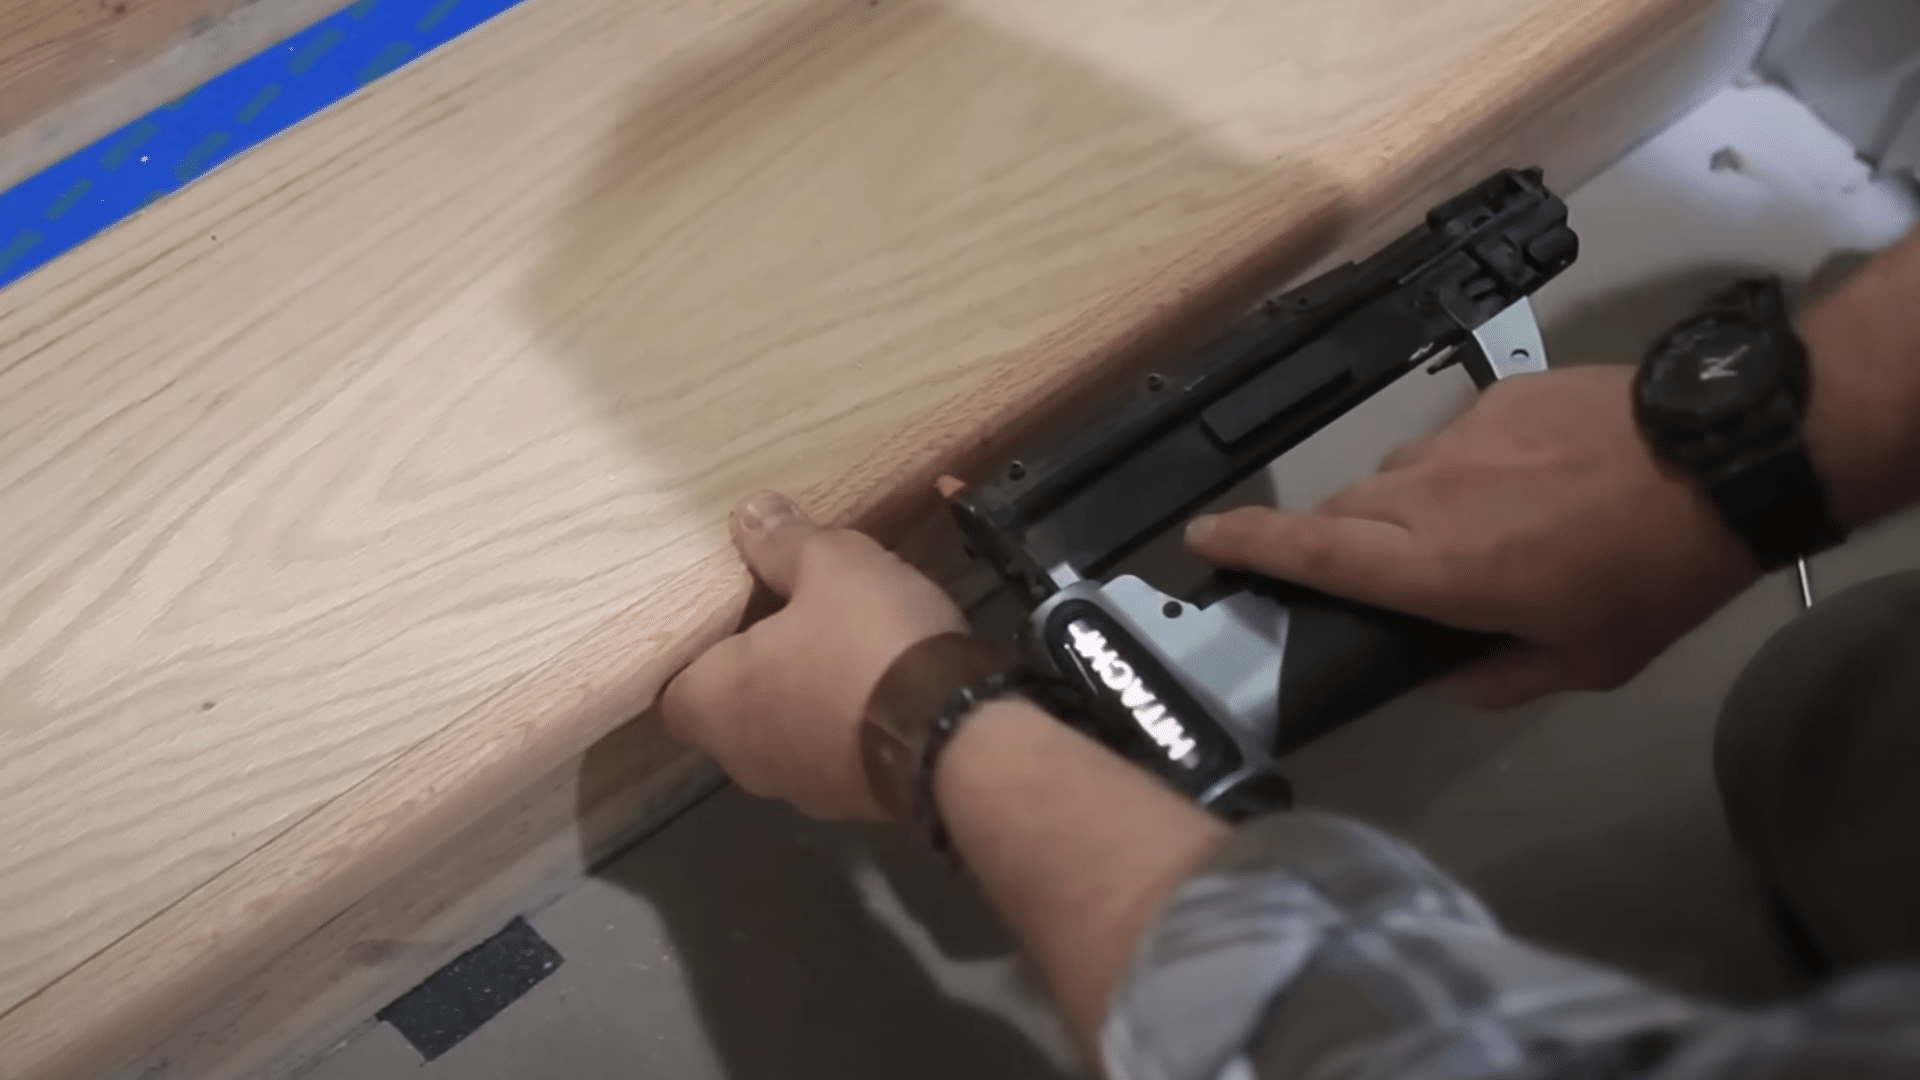
Secure it with a brad nailer or pin nailer to keep it in place. Let the plywood slightly overhang (~1/16″) to create a tight fit with the bullnose later.
Repeat this for all steps. Plywood is durable, easy to cut, and much cheaper than solid hardwood.
Step 6: Create and Install Bullnose Trim
The bullnose creates a finished edge and gives your stairs a custom-built look.
-
Use solid oak strips and round both edges with a router fitted with a ¾” roundover bit. Sand all sides of each strip for a smooth, splinter-free surface. Cut each piece to the width of your stair tread.
-
Apply wood glue to the edge of each step and firmly press the bullnose into place. Nail it down using a pin nailer, making sure it’s slightly higher than the plywood so you can sand it flush.
This method mimics the curved, polished edges of high-end staircase designs at a fraction of the cost.
Step 7: Stain and Seal the Treads
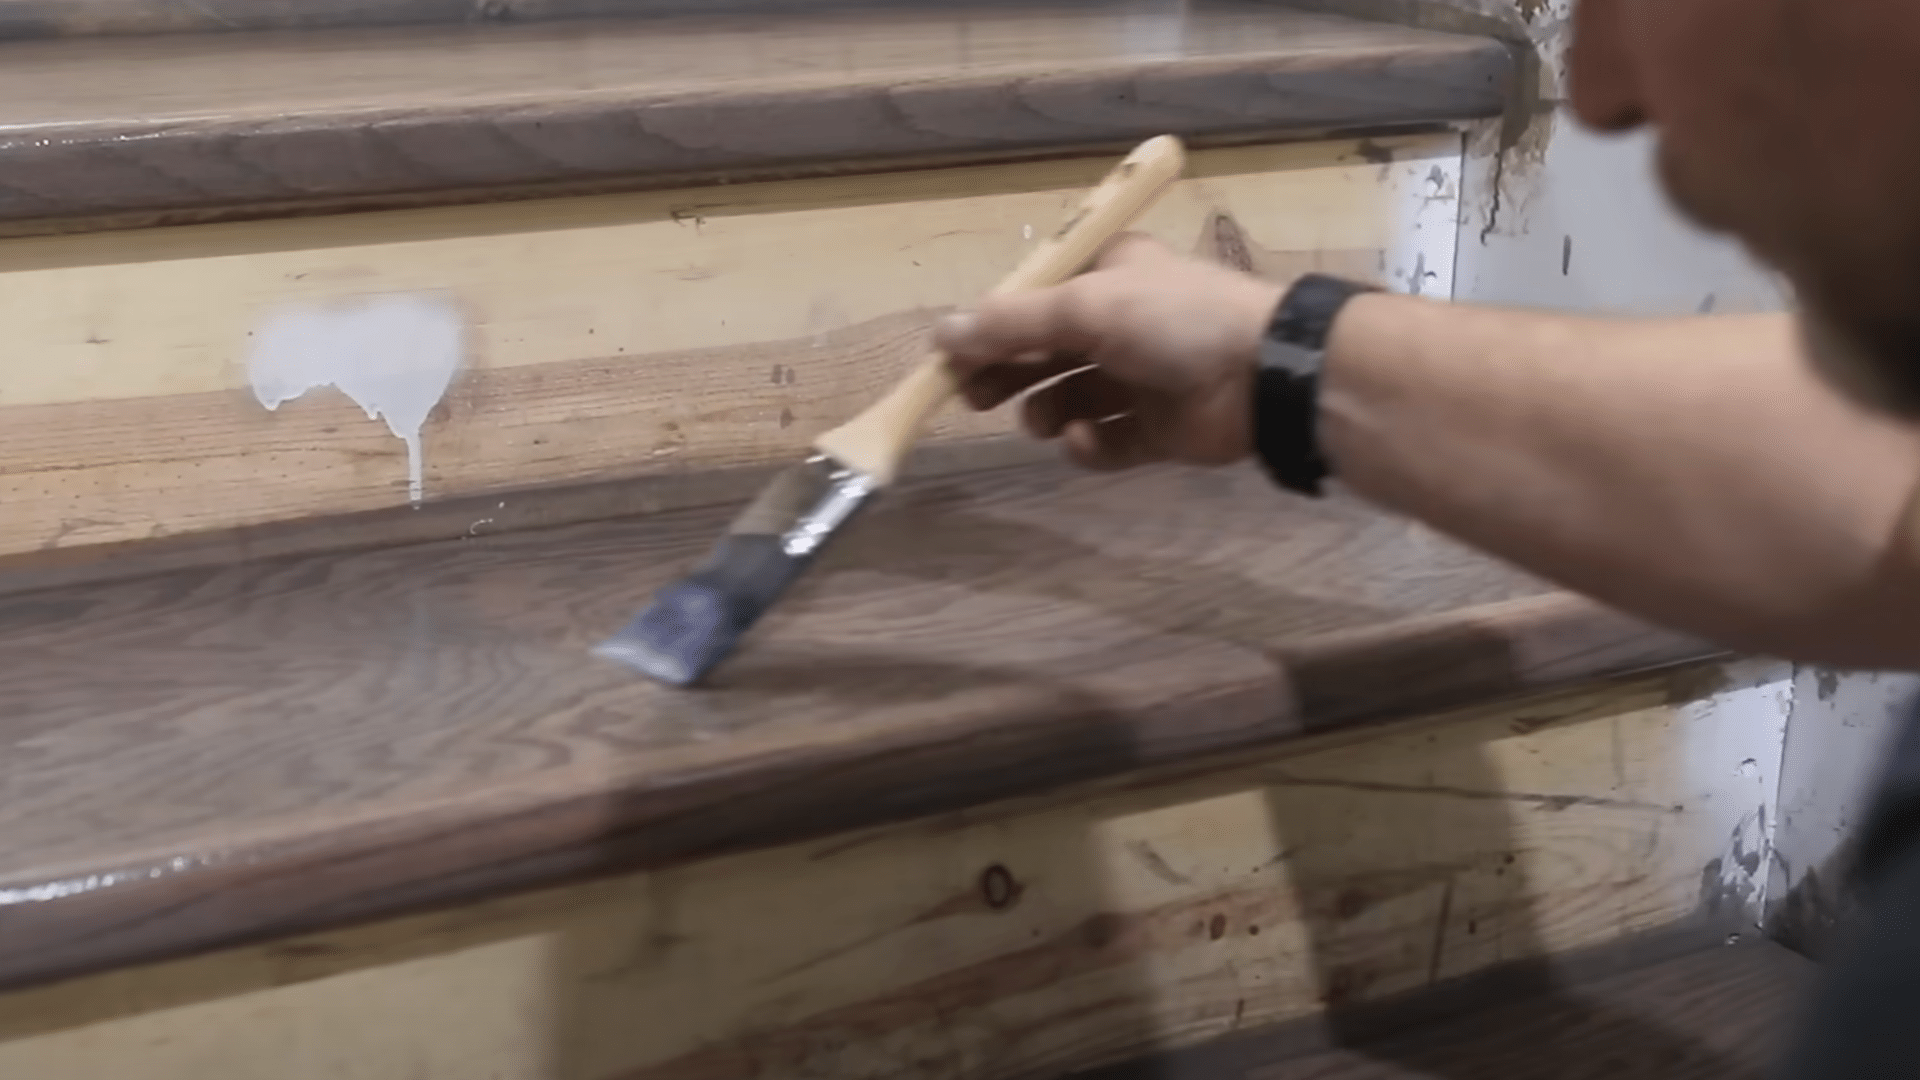
Now it’s time to bring out the natural beauty of the wood.
-
Choose a wood stain that complements your flooring or home decor. You can mix stains or layer them for a custom tone. Apply with a clean rag or foam brush, wiping away excess as you go.
-
Allow each coat to dry before deciding if you want to deepen the color. Once satisfied, apply a polyurethane sealer. One-coat poly is a great time-saving option and gives a smooth, protective finish.
Let it cure completely before walking on it—this protects your hard work and keeps your treads looking great longer.
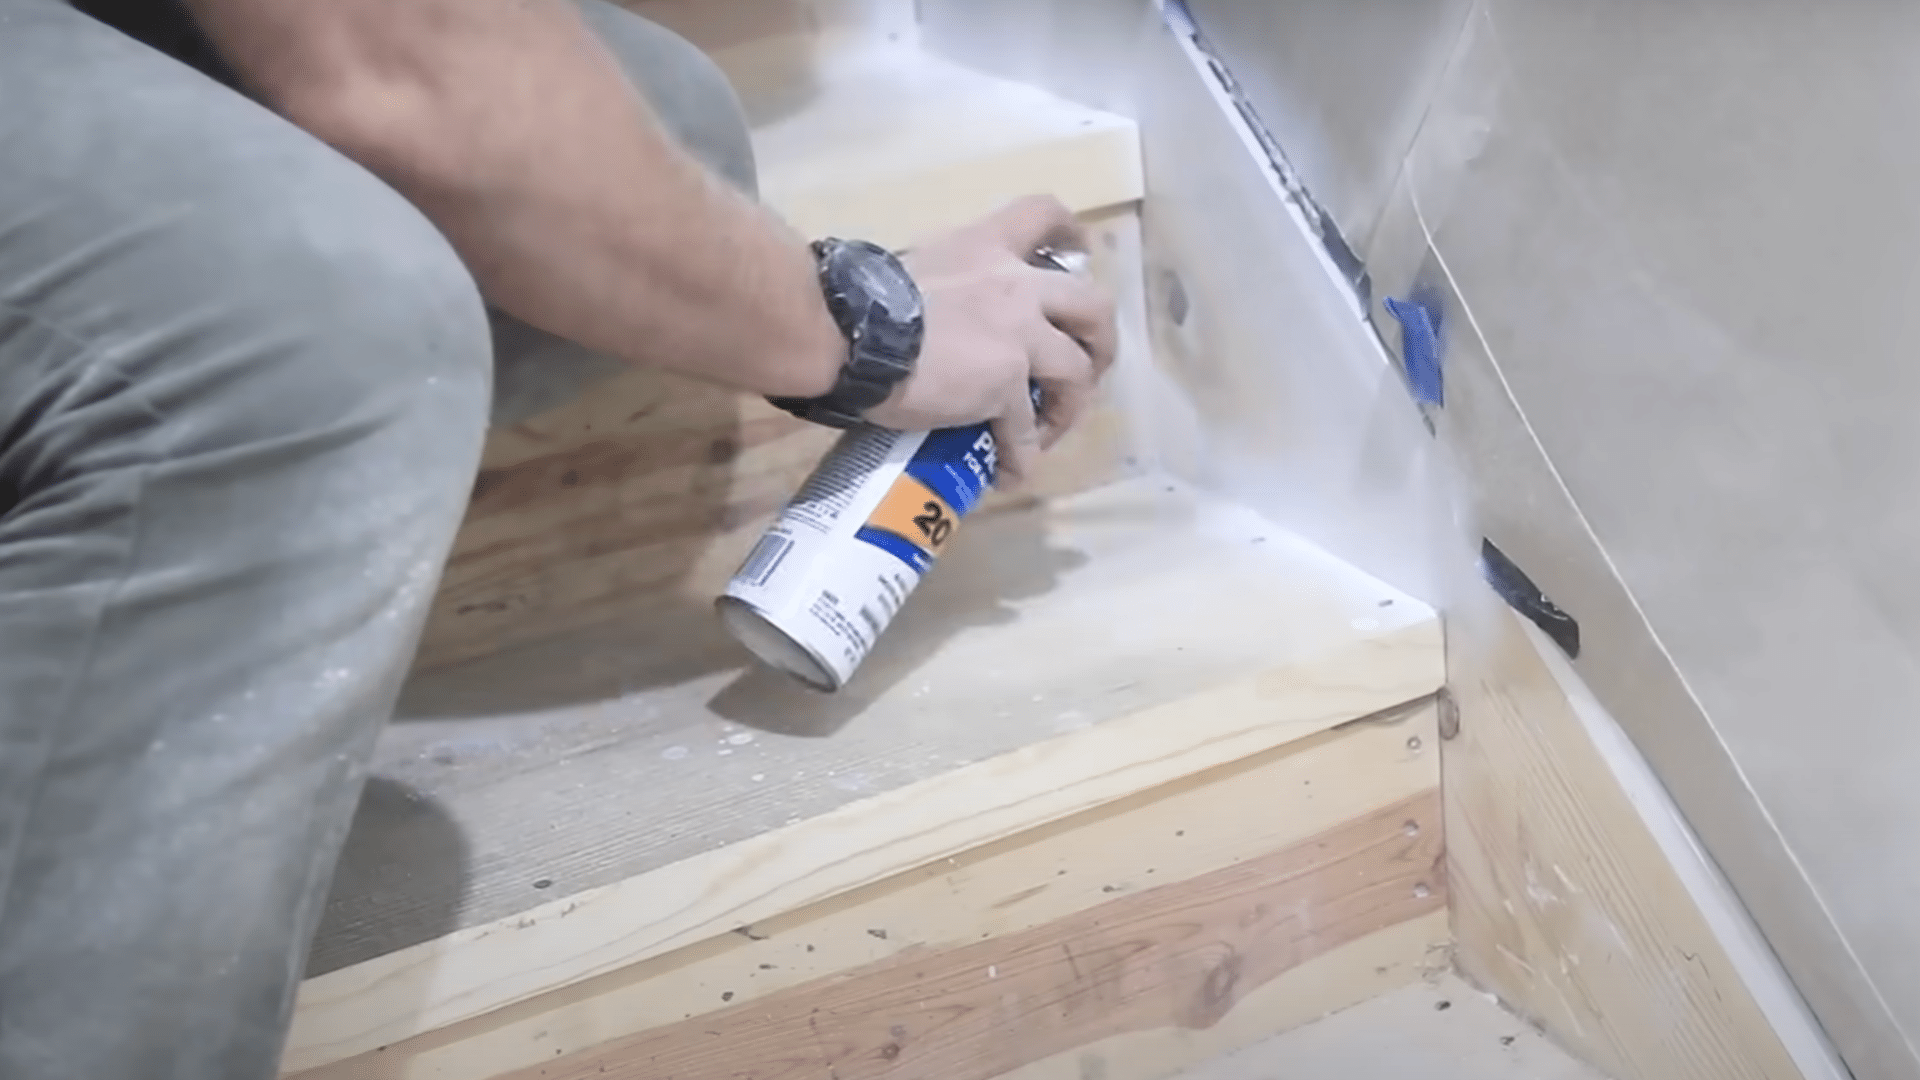
Step 8: Cut and Install the Risers
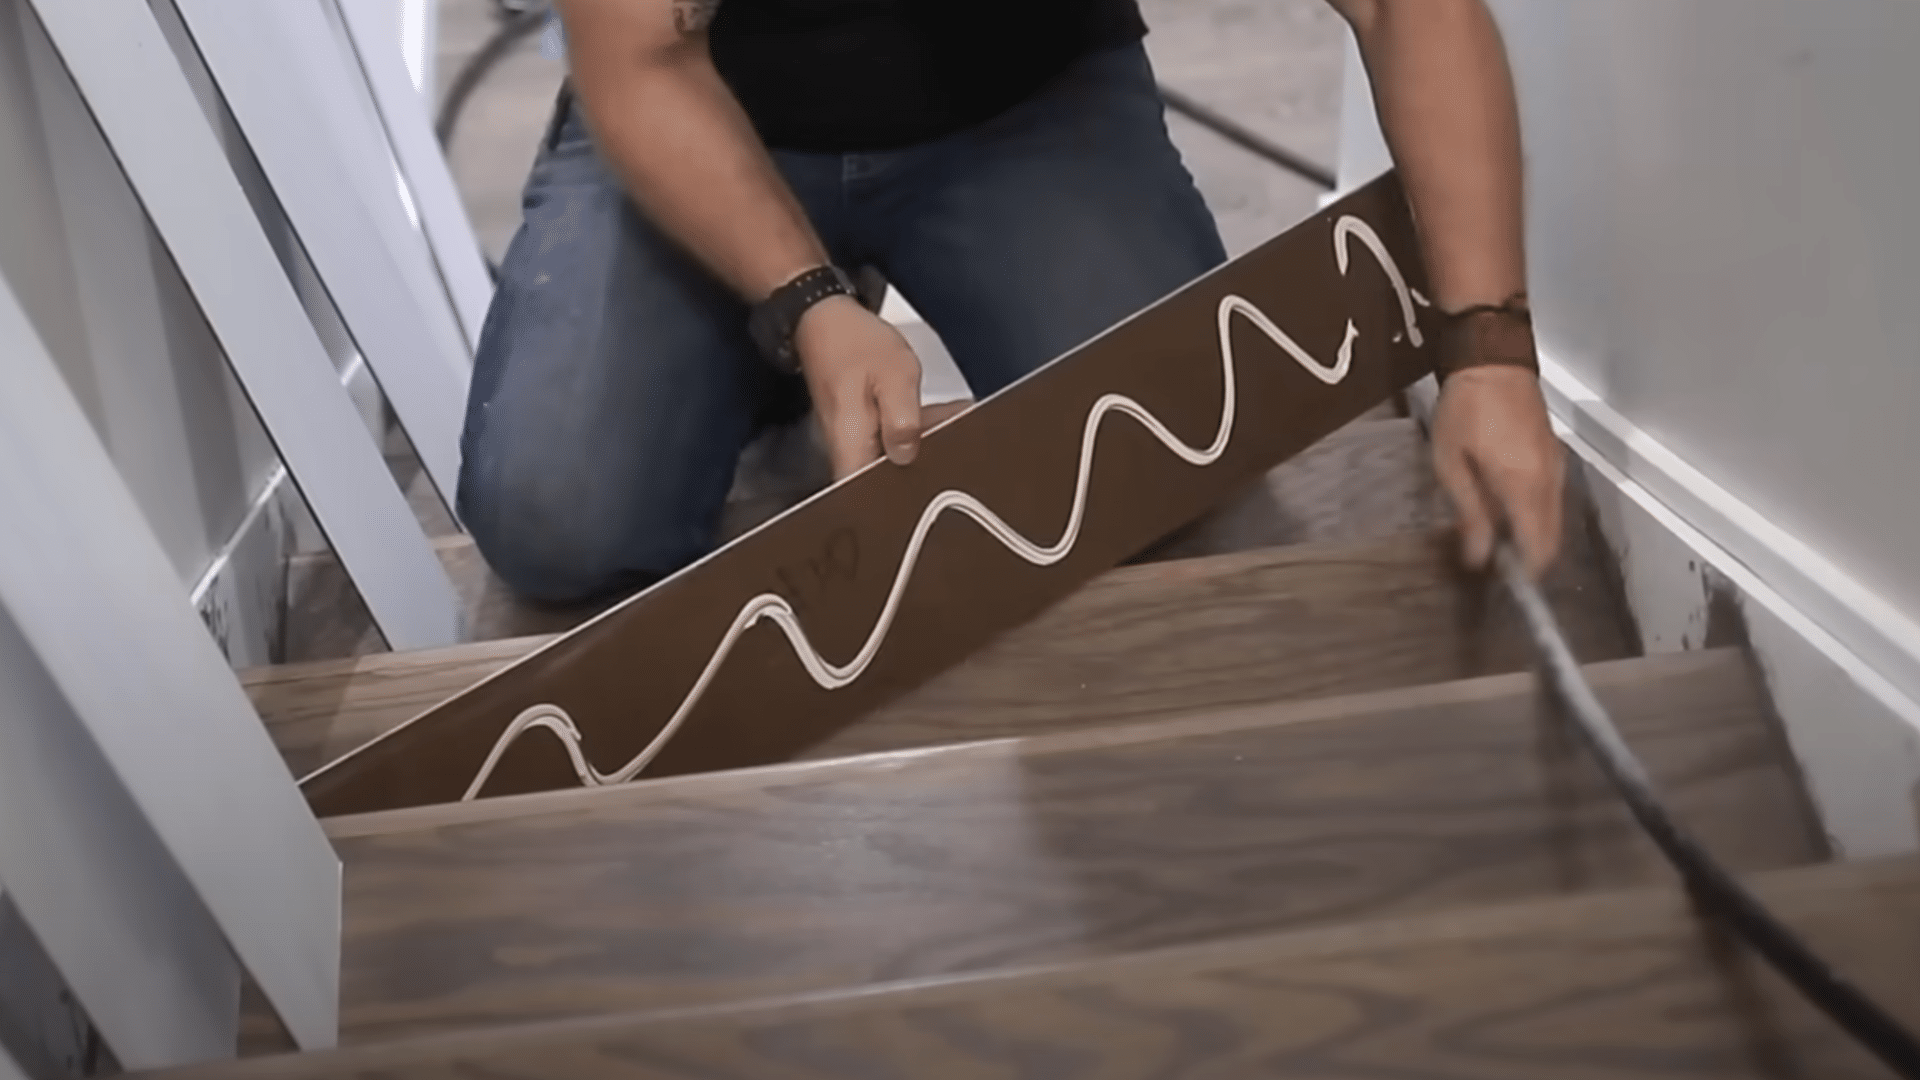
Risers create the vertical backdrop for each tread and should look just as polished.
-
Use hardboard or MDF for a cost-effective, smooth riser surface. Cut each riser to size using a table saw for crisp edges. Lightly sand and then prime each one before installation.
-
Apply liquid nails to the back and press them firmly into position. Secure with a brad nailer or pin nailer, then allow to dry.
The crisp white of painted risers will contrast beautifully with the stained treads and elevate the entire staircase.
Step 9: Caulk and Touch Up

To give your stairs a clean, built-in look, seal all the edges and gaps.
-
Use a paintable acrylic caulk to fill joints between treads, risers, and stringers.
-
Apply the caulk smoothly and wipe away any excess. Once dry, touch up with paint as needed to make everything look seamless.
This final touch makes your makeover look polished and professional.
Before and After: See the Difference

One of the most satisfying parts of a DIY stair makeover is seeing just how much of a difference your efforts make. Small changes can convert outdated stairs into a modern, stylish centerpiece.
The left shows the stairs before the makeover: dull and outdated wood, whereas the right one displays perfectly highlighted stairs for your home, with a seamless blend of modernity and grace.
Video Tutorial
Please refer to this video by Komar Project for further guidance and support.
Budgeting Tips!
Just because you’re working with a small budget doesn’t mean your stair makeover has to look basic. With a few smart tricks, you can create a high-end look without spending a fortune.
Here are some budget-friendly tips to help you stay stylish while saving money:
-
Shop discount stores or use leftover paint: Check clearance sections at home improvement stores or use leftover paint from other projects to avoid buying new cans. A small amount of paint can go a long way when you’re just covering risers or a railing.
-
Use peel-and-stick options instead of full installs: Peel-and-stick wallpaper, stair decals, and grip strips are affordable, renter-friendly, and super easy to apply. They instantly add charm and texture without requiring special tools or permanent changes.
-
Repurpose old materials or rug scraps: Do you have an old runner, fabric remnant, or wood piece lying around? Use them on your stairs to give them a second life. This not only saves money but also adds character and sustainability to your project.
Conclusion
There you have it—a totally changed staircase that didn’t break the bank!
What started as a worn-out, forgotten part of your home is now a standout feature that greets everyone who walks through your door. The best part? You did it yourself, saving hundreds (or even thousands) of dollars that would have gone to contractors.
It’s important to remember that you don’t need fancy tools or professional training for home improvements! Often, all it takes is a weekend, some basic supplies, and a little courage to try something new. You can do it!
Pause and appreciate your wonderful creation! Those stairs now share a story—your inspiring tale of creativity and determination.