Want to create a feeding spot for your dog that’s both practical and attractive? A dog bowl stand might be the answer.
But store-bought stands can be costly and may not always be specially personalized to your dog’s size.
But the good news is that making your own DIY dog bowl stand is simpler than you might think. In this guide, we’ll walk through everything you need to know about creating your dog bowl stand.
From the tools you’ll need and step-by-step instructions to money-saving tips and ways to make your stand last longer.
No matter if you’re new to DIY projects or have some experience, you’ll find this project both fun and rewarding. Let’s get started on making a feeding station that’s perfect for your furry friend.
Must-Have Tools for Your DIY Dog Bowl Stand
Before you begin building your DIY project, make sure you have the right tools for the job. These essential tools will help ensure your project goes smoothly and your Dog bowl stand is both sturdy and beautiful.
| Tool | Purpose |
|---|---|
| Jigsaw | Used to cut the wood pieces, including the circles for the bowls. |
| Measuring Tape | Helps measure the size of the bowls and wood pieces accurately. |
| Drill | For drilling holes, especially if you’re using pocket holes. |
| Screwdriver | Needed to drive screws into the wood (if not using wood glue). |
| Saw | If you need to cut wood pieces to size (e.g., 2×2 or 2×4 wood). |
| Wood Glue | An alternative to screws, for holding pieces together. |
| Sandpaper | To smooth rough edges of the wood after cutting. |
| Paintbrush | For painting or staining the wood to finish the stand. |
| Polyurethane | To protect the wood from water damage (if you want to finish it). |
Step-by-Step Process for a DIY Dog Bowl Stand
Now that you understand the basics, let’s walk through each step of the process.
From measuring the bowls to finishing your stand, these instructions will guide you in creating a sturdy and functional DIY dog bowl stand
Step 1: Measure the Bowls

Start by measuring the outer diameter of your dog’s food bowls, including the lip (the raised edge). Subtract the lip’s width from the total measurement to ensure the bowls fit properly.
This will give you the correct size for the holes you’ll cut in the wood.
Pro Tips:
- Measure both the width of the bowl and the lip carefully for a precise fit.
- Use a ruler or measuring tape to ensure your measurements are accurate so the bowls don’t sit too loosely or tightly.
Step 2: Cut the Wood for the Bowls

Mark the measurements on the wood where the bowls will sit. Drill a small hole in the center of each spot to give your jigsaw a starting point.
Then, carefully cut out the circles with a jigsaw. If you want a cleaner, more precise cut, you can use a flush trim bit with a router, which will give you a smooth edge.
However, a jigsaw can still get the job done if you don’t have a router.
Pro Tips:
- Cut slowly and follow the lines as closely as possible for neat edges.
- If you don’t have a jigsaw, a hole saw attachment for a drill can also work well.
- Practice on a scrap piece of wood first to get comfortable with the jigsaw.
- If using a flush trim bit, it helps ensure that the edges of your cut are neat and smooth. It’s a great tool for perfecting the circle edges after using the jigsaw.
Step 3: Build the Base

Measure and cut your base pieces to size. For the legs, cut them to about 11 inches. If you’re using 2×4 wood, cut it down to the appropriate width (around 1.5 inches by 1.5 inches).
Attach the legs to the main piece that holds the bowls.
Pro Tips:
- Make sure the base is sturdy enough to support the weight of the bowls without tipping over.
- If you have a larger dog, consider making the legs slightly longer to give the bowls more height.
- Check the alignment before attaching the pieces to make sure everything fits properly.
Step 4: Assemble the Stand

Now, it’s time to put everything together. Attach the base pieces (legs and apron) to the main platform using wood glue or screws. If you prefer a stronger hold, use pocket holes, but wood glue will work fine for this project.
Pro Tips:
- Make sure all sides of the stand are even and square before securing them with screws or glue.
- If you’re using glue, clamp the pieces together until dry to avoid shifting while they set.
- Use screws for extra strength if you’re worried about the stand staying sturdy.
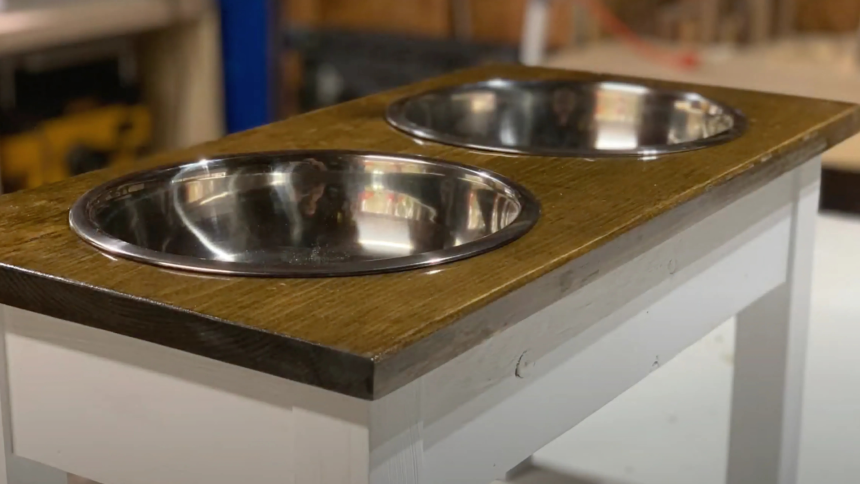
Step 5: Paint and Finish

Apply a coat of dark walnut stain to the top of the stand for a rich, natural look. Once the stain has dried, apply white latex paint to the base.
After the paint is dry, finish with a clear polyurethane coat to protect the wood from water and damage.
Pro Tips:
- Let each coat of stain, paint, and polyurethane dry fully before applying the next to avoid smudging.
- If you want a more durable finish, apply a second coat of both stain and polyurethane.
- Use a foam brush for a smoother paint finish without brush marks.
Check this Video for a Detailed Explanation
If you want to see how it all comes together, this video breaks it down in a clear and simple way.
Credits- Mombo Woodworks
Total Estimated Cost (Depending on Materials and Tools)
Below is an estimated breakdown of what you can expect to spend based on the materials and tools you’ll need
| Item | Estimated Cost | Notes |
|---|---|---|
| Wood (Plywood or 2×2/2×4) | $10 – $20 | For the base and top. Prices vary by type and size. |
| Jigsaw | $30 – $80 (if you don’t own one) | One-time cost, but essential for cutting wood. |
| Drill | $30 – $60 (if you don’t own one) | Needed for drilling holes for screws and attaching pieces. |
| Wood Glue | $5 – $10 | If you choose to use glue instead of screws. |
| Screws (Optional) | $3 – $8 | For securing the pieces together, if not using glue. |
| Paint or Stain | $10 – $15 | For finishing the stand. You can use both stain and paint. |
| Polyurethane | $8 – $12 | To seal the stand and protect it from water. |
| Sandpaper | $3 – $5 | To smooth the edges of the wood after cutting. |
| Measuring Tape | $5 – $10 | If you don’t already have one. |
| Brush or Foam Brush | $3 – $8 | For painting or staining. |
Total Estimated Cost: $40 – $150
Note: Prices are estimated and can vary based on location and quality of materials.
Tips to Increase the Longevity of Your Diy Dog Bowl Stand
Your DIY dog bowl stand will face some wear and tear over time, especially with daily use and spills. Water from the bowls, food residue, and the occasional knock can cause the wood to warp, weaken, or even stain.
By taking a few simple steps to protect it, you can make sure your stand stays sturdy and looks great for years to come.
- Use Outdoor Wood Sealant, which protects wood from moisture and prevents swelling or warping.
- Add Metal Brackets for Support: These reinforce the legs for extra stability and prevent wobbling.
- Double Layer the Top: Adds strength to the top and prevents bowing.
- Seal Bowl Cutouts with Silicone: This keeps water from seeping into the wood and causing damage.
- Use Stainless Steel Screws: Prevents rust and corrosion from moisture exposure.
- Add a Removable Bottom Tray: Catches spills and keeps the base dry.
- Use High-Quality Stain: Provides a durable, long-lasting finish that resists wear and tear.
Ideal Height of Dog Bowl Stands for Different Dogs

The bowl should be at the same level as your dog’s elbows when they are standing. This keeps them in a comfortable, natural eating position.
General Rule of Thumb: Bowl Height = Dog’s elbow height.
With that rule in mind, here’s a breakdown of the ideal bowl heights for different dog sizes.
| Dog Size | Ideal Bowl Height | Reason |
|---|---|---|
| Small Dogs (up to 15 lbs) | 3 to 6 inches | Small dogs don’t need elevated bowls, making it easier to eat and drink without strain. |
| Medium Dogs (16 – 50 lbs) | 6 to 12 inches | Slight elevation helps with neck alignment and digestion. |
| Large Dogs (51 – 100 lbs) | 12 to 18 inches | Elevation reduces strain on the neck and back. |
| Extra-Large Dogs (over 100 lbs) | 18 to 24 inches | Helps prevent neck and joint strain by raising the bowls higher. |
In Summary
Building your own dog bowl stand is a project that combines practicality with a personal touch. Not only will you save money compared to buying one, but you’ll also create something that fits your dog’s needs perfectly.
Don’t worry if you’re on a tight budget – there are plenty of ways to cut costs without cutting corners. Use scrap wood, borrow tools, or skip some finishing steps to keep expenses down.
Remember to measure your dog’s height carefully before starting, as the right height is key for your pet’s comfort and health.
By adjusting the height of the stand according to your dog’s size, you can ensure they eat comfortably and with proper posture, promoting better digestion and overall well-being.
Thank you for your time and patience – now you’re ready to create a practical, personalised dog bowl stand that both you and your pet will love!