Finding centres and setting out the wall tiles |
 |
Welcome to the second part of our tiling guide.
In this part of the tutorial we show you how to find the centre of your walls and also how to set out your tiles.
continued from: Part 1
|

|
This page is © Copyright 2001-2014 helpwithdiy.com |
|

Please note: We will accept no responsibility for any damage or injury as a result of following this guide.
For further information please see our disclaimer, a link to which can be found at the bottom of this page.
|

Finding the horizontal and vertical centres |
 |
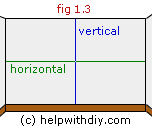
The next step is to find the horizontal centre of the wall. Measure the wall from top to bottom to find the centre, mark the position and then use your level to mark the position across the whole surface (see fig 1.3).
Do the same for the vertical centre, measure from left to right and mark the centre position, then use the level to mark the entire surface from top to bottom (see fig 1.3).
|
note - You can also find the centre spot of a wall by running string or a chalk line from the top left corner to the bottom right corner, then the top right corner to the bottom left corner. Where the two meet in the middle is the centre.
|

Checking the horizontal tile positions |
Now with your guide rod (horizontally) butt the right end (with no spacer gap) up against your vertical centre line, ensure the guide rod is level (see fig 1.4 below).
If your guide rod is more than a tile width short of the adjoining wall then mark the left hand edge of the guide rod. Slide the rod to the left and butt one of the other tile marks (excluding spacer) up against the mark you just made (see fig 1.5 above).
You can now see how much you will have to cut off the last tile on the left, if you find the gap on the left is too small then try aligning one of your tile centre lines on your guide rod with the vertical centre line on the wall.
When you are happy with the horizontal positioning of the tiles mark each tile edge on the wall.
|

Checking the vertical tile positions |
To find the ideal vertical positioning you can use the same method as you just used for the horizontal positions (using a different guide rod if your tiles are taller than wide).
When you are planning your tile positions bear in mind that most floors are slightly uneven, it can cause problems if you position your tiles based on a full tile at the bottom.
Because the bottom row of tiles is one of the last rows to complete, you can get around this problem by leaving the space for the bottom tile smaller than the height of the tile, this allows you to trim each individual bottom tile to the exact size later.
For example, if your tile was 30cm (11.8in) tall then you would make the gap for the bottom tile 26cm (10.2in), leaving you 4cm (1.6in) to play with if the floor around the room runs unlevel.
|
|
|

|
In part 3 we will take you through the process of measuring and fixing the battens, applying and spreading the adhesive, and getting the first tile on the wall.
|


|
|
|
